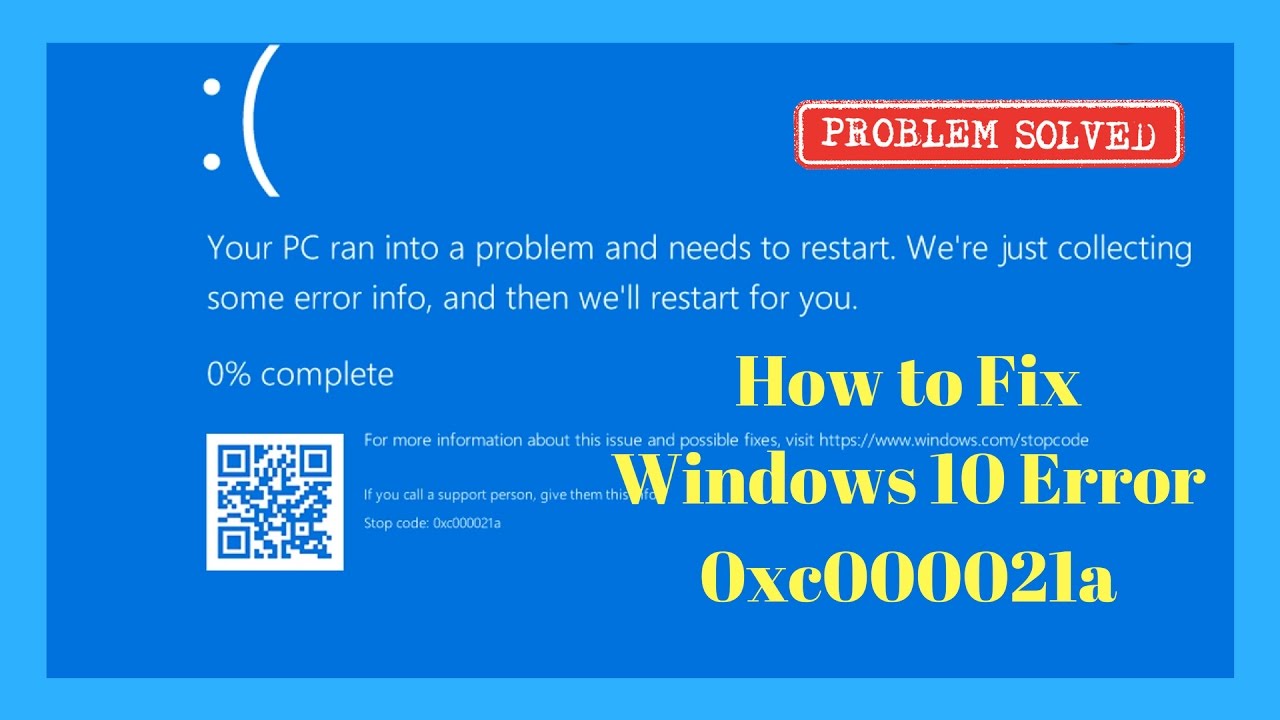
When your computer abruptly crashes, you may be presented with the dread of all tech enthusiasts: a Blue Screen of Death. This stop code alerts users to an issue that must be addressed for their system’s well-being – and though it can often just signify a one-time error, more serious problems could occur when the 0xc000021a Windows update occurs. In this article we explore why this particular BSOD arises, and how you can remedy its effects!

The other associated error codes you may see with the 0xc000021a error include:
- STATUS_SYSTEM_PROCESS_TERMINATED
- c000021a {Fatal System Error}
What causes the 0xc000021a update error?
Microsoft has consistently worked to refine its Windows 10 OS, but even with the best of intentions, errors can still arise. One such bugbear is error 0xc000021a – a pesky troublemaker that causes PCs undergoing an upgrade from older versions like 7 or 8.1 to be caught in an infuriating BSOD boot loop!
Windows system errors can often be rooted in the corruption of a user-mode subsystem. This issue commonly arises from two common Windows components: one that helps link your apps to the OS, and another for interacting with hardware devices.
- WinLogon
- Client Server-Run Time Subsystem (CSRSS)
To repair an issue, this guide has all the solutions you need- specifically tailored for Windows 10. Be sure to check your version before getting stuck in!
9 proven solutions to the 0xc000021a Windows update error
With a dreaded BSOD error, the solutions can sometimes seem overwhelming. However, there are nine reliable options to get you back up and running quickly! Depending on whether or not you’re able to log in and make changes will affect which solution works best for your needs – so take a look at this list of tried-and-true methods that could be just what’s needed to solve the issue.
If you require a technical solution, methods #1 and #2 are your go-tos. For those who can access the Windows UI, there’s an additional suite from 3 to 8 as well. And if all else fails – method 9 is your last shot at success!
1. Unplug External Devices
Is your computer giving you the dreaded 0xc000021a blue screen of death? It might be caused by peripheral devices interfering with how your machine interfaces. To fix it, unplug everything from USB ports besides a mouse and keyboard for navigation when booting up; that includes flash drives or any external hard drive. If all goes as planned, once these steps are taken then simply restarting should take care of the issue!
2. Startup Repair
Get your Windows 10 back up and running in no time by using this simple method! It provides a foolproof solution to stop the 0xc000021a error dead in its tracks – perfect if you’re having trouble booting into a desktop. Don’t let that pesky bug ruin all your fun; quickly restore order with just a few clicks of the mouse!
Here is how to perform a Startup Repair:
- Start your computer by pressing the Power button.
- When the Windows 10 splash screen appears, immediately turn off the system.
- Windows knows something is wrong when you attempt the same task multiple times. Fortunately, it will then access Recovery Environment and provide repair options to resolve your issue.
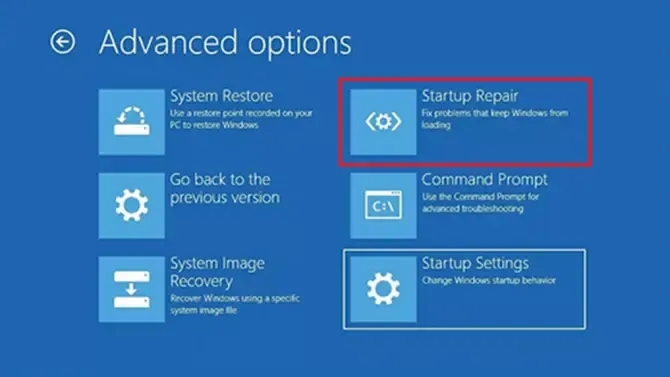
- When your device enters Automatic Repair mode, don’t give up hope! There’s still a chance of recovery – just select the Advanced Options (or Troubleshoot for even more options) and keep on trying.
- Select Startup Repair.
With this simple repair, you can jumpstart your system and banish any startup concerns. Finish up the process then reboot for a hassle-free start!
3. Perform a Clean Boot
Tune up your system by initiating a clean boot! This process helps identify which Windows service may be causing an error, ensuring the smooth running of the machine.
To clean boot your Windows system:
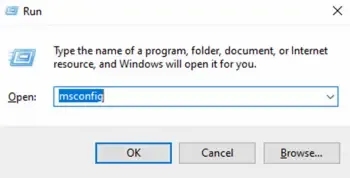
- Click the Windows Key (between Alt and Ctrl on your keyboard) + R.
- In the Run utility window, type “msconfig” and press Enter.
- In the System Configuration Window, make sure you are in the General tab. Then Click Selective Startup.
- Uncheck Load startup items.

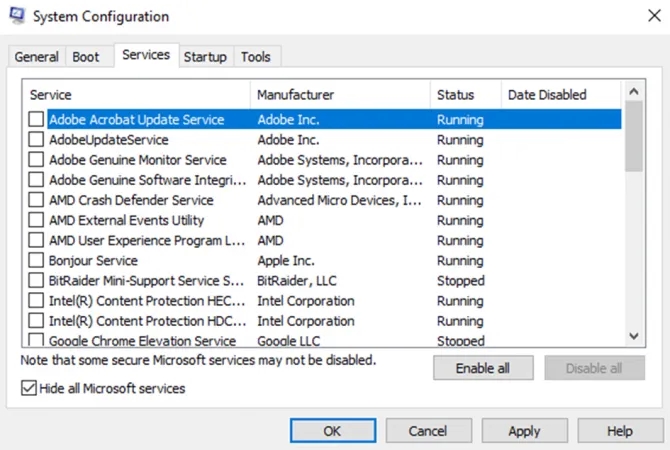
- Navigate to the Services tab and check to Hide all Microsoft Services in the bottom right, and then click Disable all.
- Finally, in the Startup tab, disable all services individually by right-clicking and then selecting Disable.
- Now restart your system.
To pinpoint the culprit of a 0xc000021a BSOD error, try starting Windows with only one service enabled at once. Reboot after enabling each new service and if the dreaded blue screen returns you’ll know which specific startup program is responsible for your frustration!
4. Run the SFC scan tool
Windows 10 packs a powerful punch with its built-in System File Checker tool. This handy resource can help repair corrupted system files and restore your computer to working order, avoiding the dreaded Blue Screen of Death!
- Click the Start Menu button and search for Command Prompt.
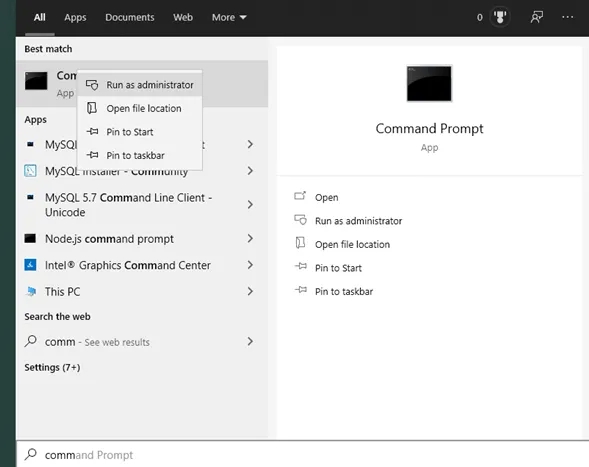
- Right-click the app, and select Run as administrator.
- In the Command Prompt window, type in: sfc/scannow
- Then hit Enter.
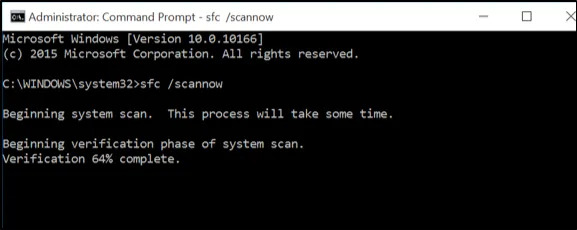
- Wait until verification is 100% complete.
The tool will inspect your system for any file integrity violations. If everything looks good, you can be sure that no files were damaged or missing – phew! However, if the scan cannot complete its task, it’s recommended to restart in Safe Mode and run the process again. In this case, the tool may detect corrupt files which it’ll attempt to fix – after a full reboot of your system, hopefully, those errors won’t resurface!
Note: If you run into an SFC /Scannow error when starting the scan, don’t worry. We have written dedicated articles on what to do if SFC scanner is not working, including:
5. Disable Driver Signature Enforcement
If a pesky Blue Screen of Death (BSOD) is causing problems, it may be because Driver Signature Enforcement has been enabled to protect against malware. But if this safety measure becomes interference in the system, you can easily disable it by downloading Windows onto a bootable DVD or flash drive and following some simple steps!
- Boot your system using a Windows 10 bootable DVD or flash drive.
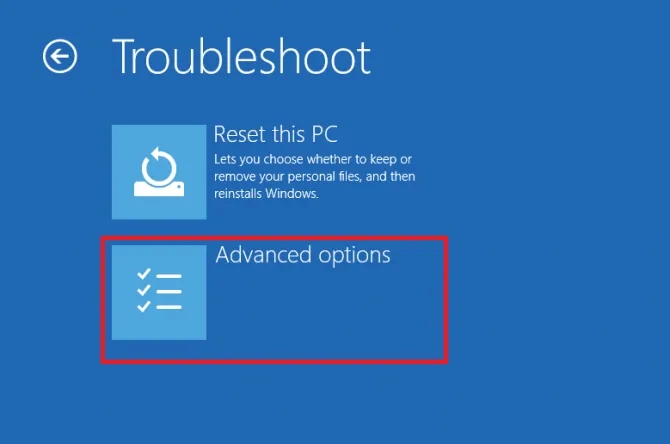
- Select Troubleshoot and then Advanced Options.
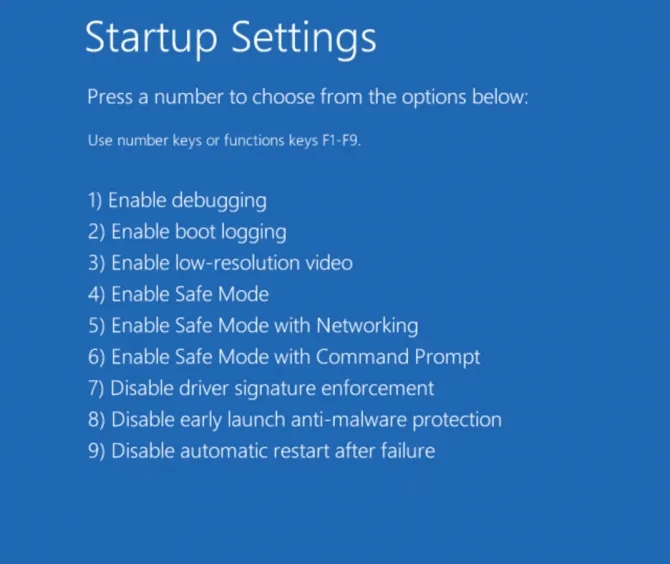
- Select Startup Settings and then select the option to Disable Driver Signature Enforcement by pressing F7.
- Restart the system without the bootable media and see if the error reoccurs.
6. Run the DISM Command
The DISM tool is your PC’s repairman – it will help to fix any troubles you might have with Windows! It stands for Deployment Image Servicing and Management, but its job of fixing corrupted installation media makes it a handy partner when dealing with computer issues.
- Open the Start Menu and search for Command Prompt.
- Right-click it, and select Run as administrator.
- When the Command Prompt opens, type in:
DISM /Online /Cleanup-Image /restorehealth
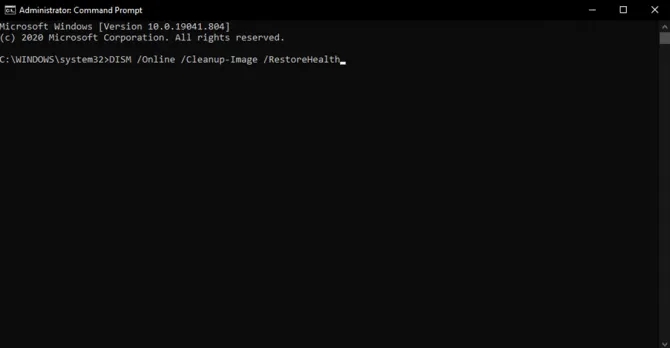
- Wait until the process is complete and don’t work on anything else while you wait.
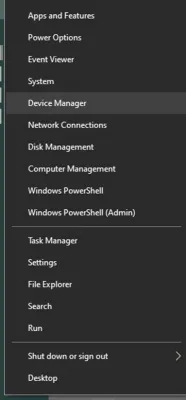
7. Update your drivers
Updating your device drivers could be the key to a faster, more efficient system. Think of it as hiring an interpreter: if you can’t properly communicate with something, any small mistake in translation is magnified and turned into major errors – including full-blown crashes! So make sure that all translators are up to date so that there’s no confusion during communication. Here’s how to check them out today:
- Right-click the Start Menu and select Device Manager.
- Expand each section in the Device Manager to see hardware with associated drivers.
- Right-click each device and select Update driver.
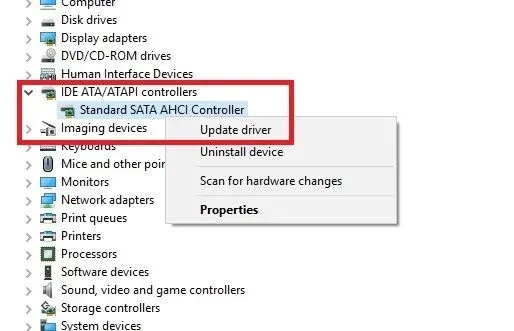
- Windows will automatically search your system and the internet for the most up-to-date drivers. If an update is found, it will be applied.
Once you’ve finished the necessary steps, reboot your system and check to see if the issue has been solved.
8. Perform a Windows reset
If all else fails and your system is caught in a loop of dismal failure, you might be ready to try the last resort option. Before throwing in the towel, however, be sure to give our initial solution a shot first – running Startup Repair may provide just enough help that saves you from having to wipe out Windows entirely!
Warning: This is a drastic solution because the reset will wipe your OS drive and erase all of your files.
Keeping your hard drive regularly backed up is essential for any data you don’t want to lose in the event of a technical disaster. Don’t take chances – following Windows reset instructions can provide peace of mind and protection against potential harm down the road.
- Start your computer by pressing the Power button.
- When the Windows 10 splash screen appears, immediately turn off the system.
- Do this 2 more times and Windows will recognize there is a problem and load the Recovery Environment where you can access the repair options.
- When the screen says Automatic Repair, click Advanced options.
- On the Choose an option screen, select Troubleshoot.
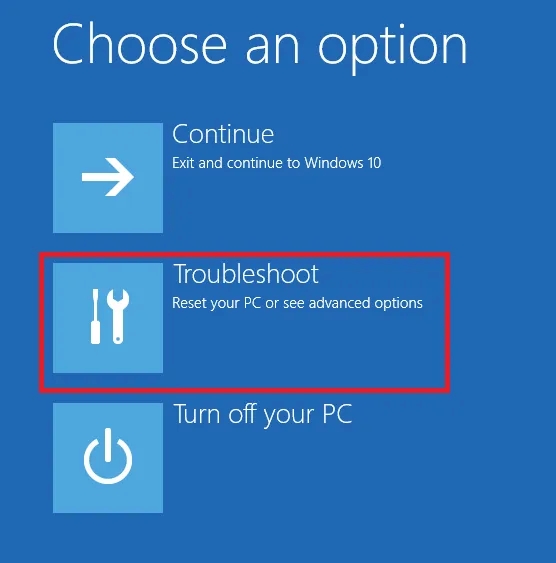
- Select Reset this PC.
- Select Fully clean the drive.
Reinstating your computer back to its Windows factory settings is the first step in returning it to a pristine, up-to-date system. It will require several hours of work and can’t be interrupted – so make sure that you don’t unplug while this process takes place! Following completion, you’ll have an upgraded version of Windows 10 ready for use.
Reinstall Windows from a bootable USB
Looking to upgrade your Windows experience? Installing a fresh version of 10 using a bootable USB can revolutionize the way you use technology. Just make sure that before starting, double-check the storage capacity and files on your USB – at least 8GB is required! Then, once everything else is ready to go, grab another computer nearby and let it help create an unbeatably up-to-date OS installation.
Here is how to reinstall a clean Windows 10 OS using a bootable USB drive:
- Connect your USB stick to a working computer.
- Right-click the Windows Start button and select Disk Management.
- Find the USB partition and right-click Format. The FAT32 file system should be selected to boot based on a BIOS or UEFI system.
- Right-click the USB partition and select Mark Partition as Active.
- Use Windows 10 Create Installation Media tool to load Windows 10 installation media onto the USB flash drive.
- Now connect the USB to the faulty computer where you want to reinstall Windows, and turn the machine on.
- Load into the boot-selection menu by pressing Esc/F10/F12, depending on the machine.
- Select to boot from the USB and follow all directions to install Windows 10.
- When the installation is complete, remove the flash drive.
Fixing those pesky critical system errors? No problem! With just a few clicks, you can eliminate any risk of the 0xc000021a error crashing your computer. Make sure to take proactive measures now and safeguard against future issues.
Problem Fixed
Windows update errors can be frustrating, but you’re in luck! This article’s various tips and tricks will help get your system back up and running quickly. With some determination and a few troubleshooting skills under your belt, that dreaded 0xc000021a error code won’t stand chance against the power of Windows’ robust protection measures working for you.