Formatting a hard drive can be simple – just open Disk Management, select the volume and click your mouse. But what do you do if you need to format the operating system on that same drive? Or when access is completely blocked to that OS altogether?! This complex situation leads many people to wonder if they can use their motherboard’s BIOS firmware instead to complete this task; let’s dive into whether it’s possible and explore scenarios where formatting would be an absolute must-do!
Can You Format a Drive from Your Computer’s BIOS?
When it comes to formatting a hard drive, many mistakenly rely on their computer’s BIOS system (firmware). Unfortunately, this is where they go wrong: while the BIOS acts as an essential tool in keeping your device running smoothly and quickly reacting to user commands, its abilities do not extend far enough for formatting drives- that task must be taken care of by other programs or operating systems. To better understand how BIOS plays into our computing lives. Let’s explore what exactly those three letters stand for!
The BIOS – the fundamental core of your computer! It’s essential programming that lies deep within every machine, responsible for testing and controlling hardware devices like RAM cards and processors. Without it, computers simply couldn’t come to life when we turn them on; so make sure you thank this silent hero whenever powering up a device!

The BIOS is the essential component to your computer’s health – it helps you start up and keep running. It tells hardware components when they need to boot, like when you have an error or are trying to format a hard drive with Windows on it. But in what cases do we really require access through the BIOS? This article will explore these scenarios for us!
Scenarios That Require You to Boot to BIOS
Formatting your hard drive can often seem like a daunting task, however there are several situations when booting to BIOS may be the best course of action. From not being able to access Windows, or wanting to customize individual settings – it’s important that you know what scenarios warrant this solution so that you’re prepared should they arise!
1. Your Computer is Stuck in a Boot Loop
When your computer doesn’t quite seem to be working as it should, you might find yourself in a boot loop – trapped on an endless cycle of restarts and failed attempts. This occurs because the initial attempt for powering up isn’t successful: if Windows fails its POST sequence (power on self test) during startup, then your machine will try to repair itself before restarting again – but sometimes this can just result in the same frustrating issue being repeated over and over!
2. You Need to Format the Entire System Partition Where Your Operating System is Located
Errors from viruses, malware, or corrupted files can be a huge headache – especially if fixing them requires formatting your system partition. But don’t despair; you just need to use the right tools in order for this deep cleanse of sorts to work without accessing it!
3. You Need to Reinstall the Operating System
If your computer isn’t performing to its usual standards or is locked out, it may be time for a fresh start. Formatting the C drive partition and reinstalling the operating system can bring life back into an outdated machine – though you cannot do this while still in use. If a restart won’t solve your issue, then dig deep and get ready to hit that reset button!
4. If There is an Issue With the Bootable Partition on Your Hard Drive
Setting up a new hard drive? Windows makes it easy, automatically creating three partitions during installation. The first bootable partition stores the start-up sequence and is vital for launching your system; whereas the second houses all other operating system data. Don’t worry if something goes wrong – simply reformatting this secondary partition will restore functionality without having to restart from scratch! Finally, there’s also an invaluable recovery partition just in case you ever need a full reboot of your whole OS.
Facing Windows-related issues and need a solution fast? You may require a ‘boot disk’ in order to tackle your problems. Need it stat but don’t know where to begin? Don’t worry – easily obtainable boot disks are available for those time crunch situations, or you can even create one yourself if you’re feeling industrious!
Creating a Boot Disk Using a USB Stick or CD-RW/DVD
Looking to create a boot disk? Well, there are two main media options available: USB and CD-RW/DVD. If your computer doesn’t have the latter drive, then you’ll most likely opt for USB; plus it’s often simpler to use! Just make sure that whichever one you pick meets the 8 GB minimum requirement – those who want DVDs may need double layer (DL) versions instead.
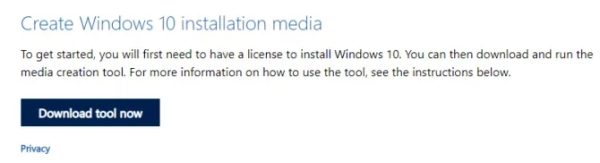
- Download the appropriate version of Windows directly from the Microsoft website. You will need your Windows product key. If you don’t know where to find yours, this website can help you do so, but if you don’t have one, you’ll have to purchase one.
- For Windows 10 users, you will need to go to the Windows 10 download page and click the “Download Tool Now” button and select “Run” once it’s finished.
- After accepting the licensing terms select the option to create an installation media for another PC.
- Select any and all additional setup options you need, such as the version and architecture of Windows you need.
- Select your chosen media device and wait for the process to complete.
3 Methods for Formatting Your Hard Drive Without Access to Windows 10
1. Reformat Without a Reinstall of Windows
- Ensure the computer is powered off, connect your installation media, then restart it. CD/DVD users will need to briefly turn their computer on in order to insert their disc first.
- Press the appropriate key(s) to enter your computer’s BIOS. Common keys include “Del” and “F8”
- Locate the boot priority options, and move your installation media (USB or CD RW/DVD) to the top spot in the boot priority.
- Restart the computer. You should be asked if you want to boot from disk. Select this option.
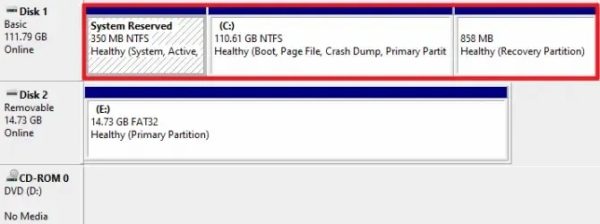
- A set of commands should appear on screen. Using these, select the drive you want to format and delete any and all partitions on it.
- Select the now unpartitioned space and create a new partition. You should then be asked how you want to format it. Select either NTFS or FAT.
- Completing this last step will completely wipe your hard drive, leaving it open to have an OS installed on it, or to be used as a mass storage device.
2. Reformat Through Windows Installation
- With your boot disk connected/inserted, ensure your computer is powered off, then restart it, hitting the appropriate key(s) to boot to BIOS when prompted.
- In the boot priority options, set your installation media as the highest boot priority, then restart the computer.
- You will be met with the Windows Installation screen. Choose your installation language, time and keyboard input, then select the “Next” button.
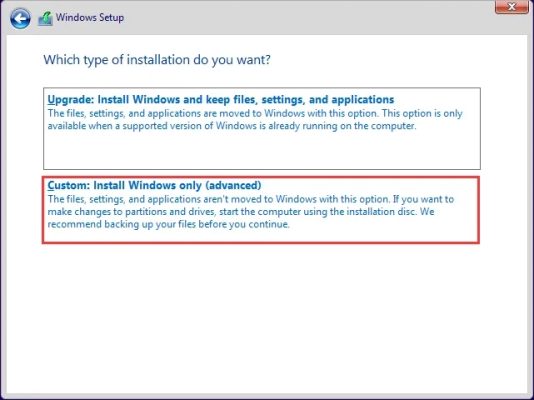
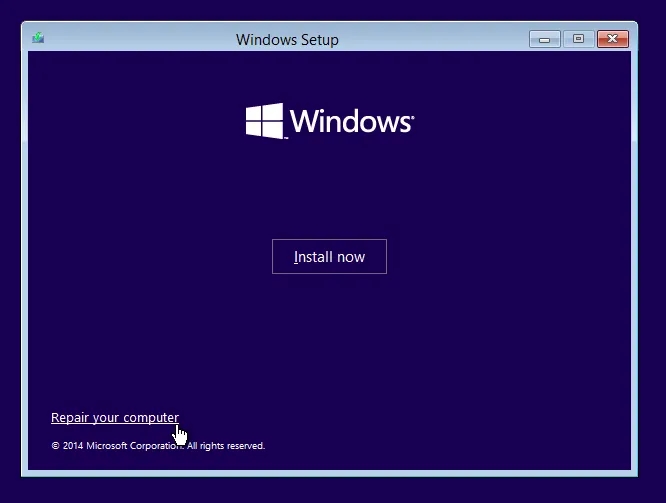
- Click “Install Now” when it appears, and follow the prompts until you reach a page asking what type of installation you want.
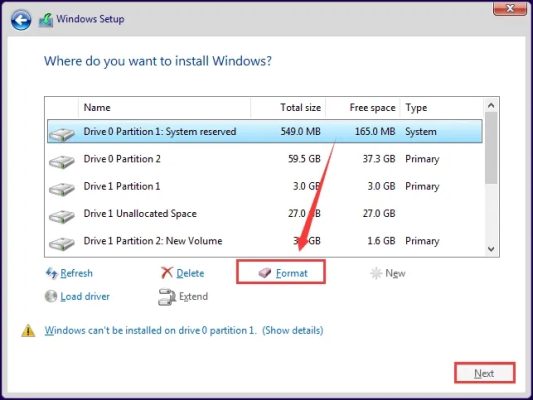
- Select the option for a custom install.
- On the page that follows, you are free to delete any unwanted partitions, but to format the drive, select the system partition, then click Format.
- You will get a popup, warning you that this will remove any data on the partition. Select OK, then wait for the process to finish.
3. Reformat Using a Command Prompt
It’s time to get your boot drive connected! If you’re using a CD RW/DVD, slip the disk into the drive before turning it off. USB users should power down first, then connect their device before rebooting and accessing BIOS mode. To make sure good things come first, be sure to give media installation disks top priority when restarting – that way they’ll take precedence over all else right away!
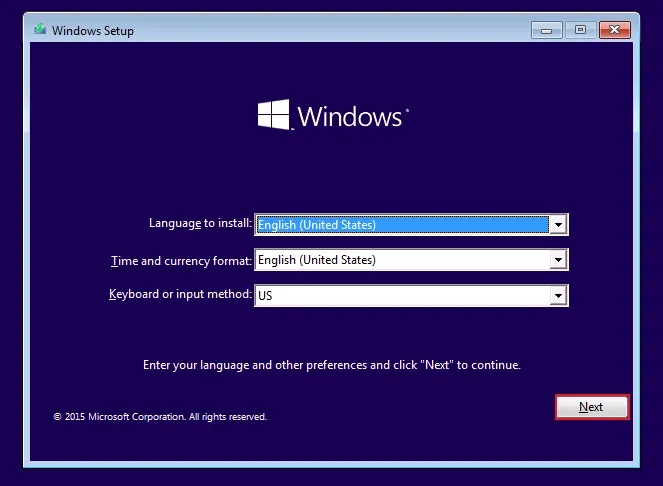
- When Windows setup loads up, you will need to select your time, currency, keyboard input, and language. Hit next on-screen.
- Instead of installing Windows, choose to repair the computer instead.
- This will take you to the advanced options screen. From here, choose the troubleshooting mode and click on the command prompt option.
- Command prompt will open up and allow you to find the disk drive you want to format. To do this, type in
- Diskpart – Enter
- List Volume – Enter
- Exit – Enter
- Dir C: – Enter.
- If your operating system drive is not labeled C, you will need to repeat the steps with F or D until you find the drive your operating system is on.
- Once you know where Windows is, you can format the drive by entering in the following command C: /fs:ntfs (replace C with F or D if this is where your Windows is installed). Then hit enter.
- To proceed with the formatting, type in “Y” for “yes” after you receive the system prompt informing you that you will lose all data if you proceed with formatting.
It’s time to format your hard drive and install Windows! With one reboot, you’ll be on your way. If for any reason the traditional methods are not available, there is always command prompt – a direct line into the programming of an operating system- ready to get things back under control.