If you’ve been noticing a strange hiccup in your audio lately, the culprit may be “Audio services not responding.” This pesky error is usually caused by Windows updates interfering with sound devices, rather than any real fault of their own. But don’t despair! Before diving into more drastic solutions like reinstalling Windows, some options could fix this issue right away – saving time and keeping annoying errors at bay.
Restart Audio Services
Are you having trouble with sound or audio devices on your Windows computer? Restarting the Audio service might be just what it needs to get back up and running.
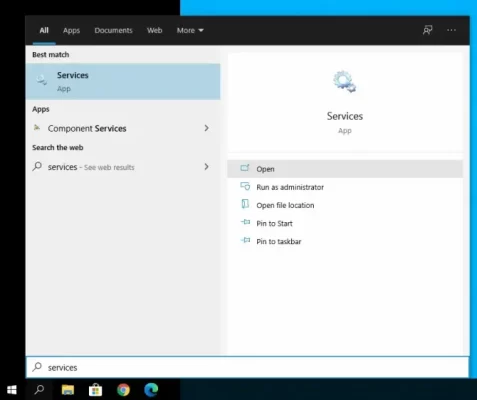
- Type “services” in the Search bar, then click on Open to bring up the Services manager.
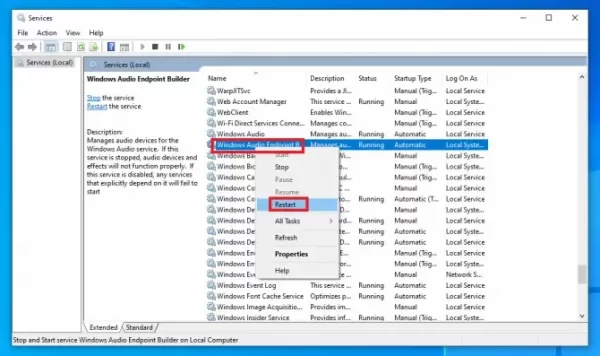
- Find the Windows Audio service, right-click it and choose Restart.
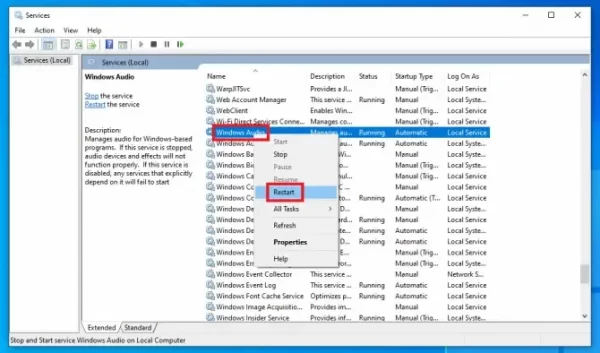
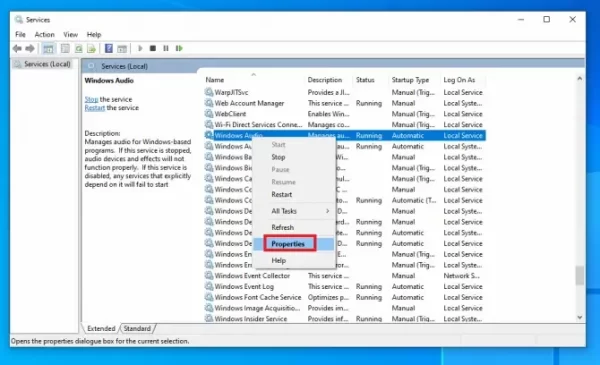
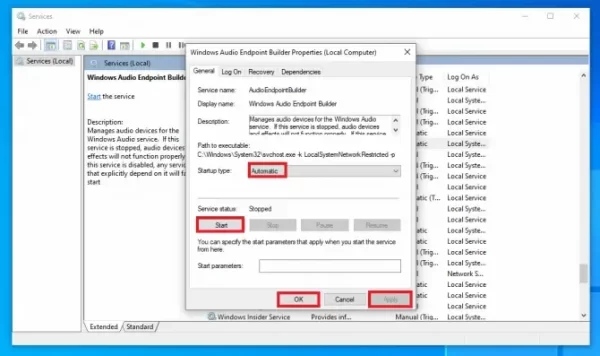
- Right-click it again, then choose Properties. Set the startup type to Automatic. Press Apply then OK.
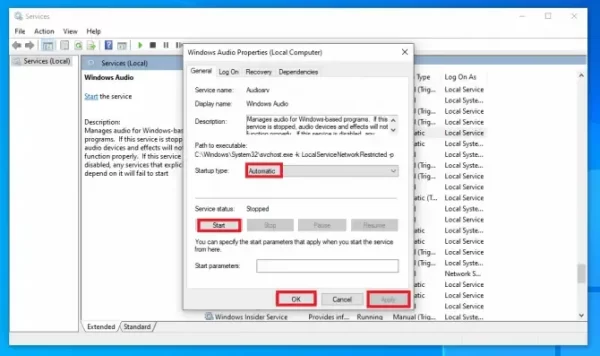
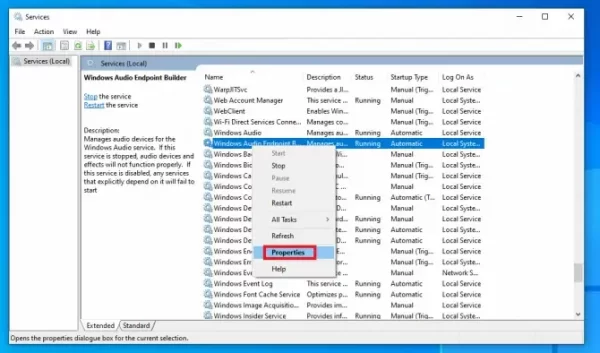
- Repeat Steps 2-3 with Windows Audio Endpoint Builder.
Restart your computer.
If the error message persists, it’s time to dig deeper. The next step will guarantee that your audio is up and running without a hitch!
Check Audio Components
When attempting to listen in, you may find yourself met with technical difficulties. If your audio services fail and the “audio services not responding” error pops up on the screen, it could be due to a glitch or an overly protective antivirus system blocking some of its components from running properly. Keep track of either culprit if any sound issues arise!
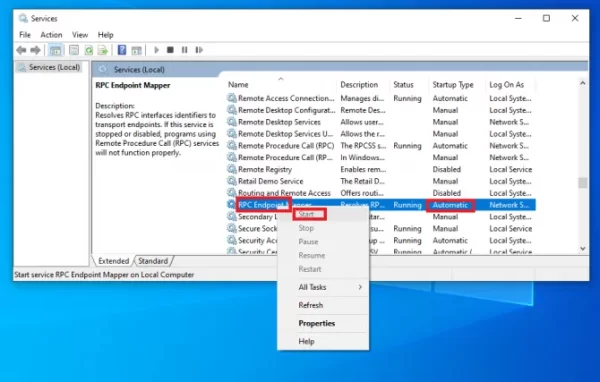
- Type “services” in the Search bar, then click on Open to bring up the Services manager.

- Find the RPC Endpoint Mapper service. If it isn’t running, right-click it and choose Start.
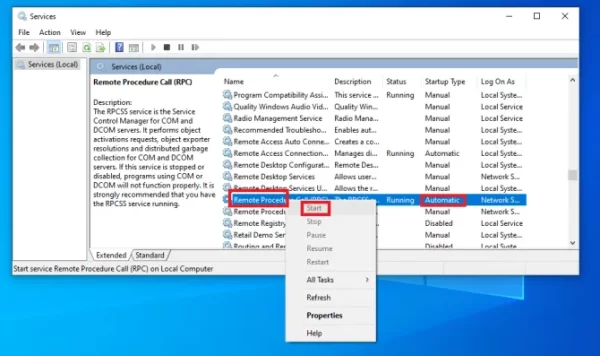
- Find the Remote Procedure Call (RPC) service. If it isn’t running, right-click it and choose Start.
- Find the DCOM Server Process Launcher service. If it isn’t running, right-click it and choose Start.
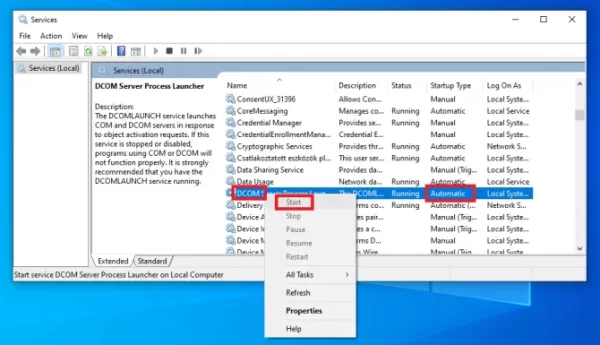
- To ensure that these three services are running efficiently, take the necessary steps to set them to Automatic Startup. Right-click each one, access its Properties, and change the setting before pressing Apply then OK.
- Restart your computer.
With the issue unresolved, it’s time to fire up Command Prompt in search of a solution.
Elevated Command Prompt Instructions
If you find yourself struggling with a particular issue, granting network service and local service access to the Administrator local group can often help. To do this, simply follow these easy steps!
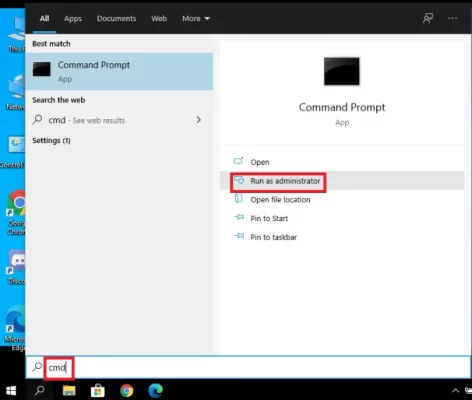
- Type “cmd” in the Search bar, then choose Run as administrator.
- Type “net localgroup administrators network service/add” then hit Enter.

- Type “net localgroup administrators local service/add” then hit Enter.

- Restart your computer.
Troubleshooting the error? Don’t give up hope! If your first attempt fell short, take it to the next level with advanced solutions. Uncover step-by-step guidance for a successful resolution – no task is too intimidating!
Install Default Drivers
Computers have an incredibly handy feature that allows them to recognize devices and install a basic driver as soon as they’re connected. This default setting can be upgraded over time, but it also serves another important role – if your audio services aren’t responding after you uninstall the most recent driver, computers will automatically reinstall their trusty backup plan of the original starter version! Let’s see how this helps us fix our “audio services not responding” issue.
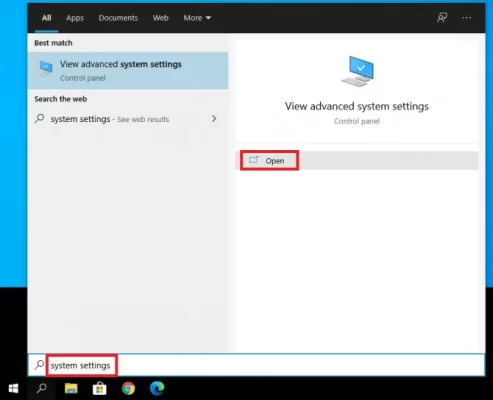
- Type “system settings” in the Search bar, and click on the control panel item View advanced system settings.
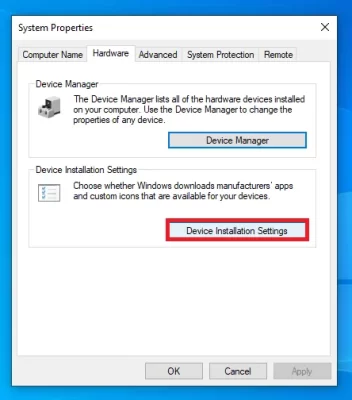
- Under the Hardware tab, click on Device installation settings.
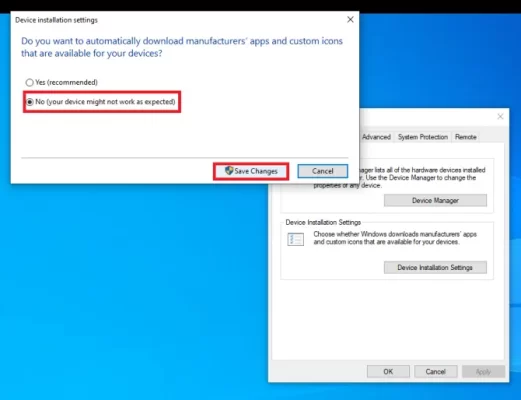
- Choose No, then click Save changes.
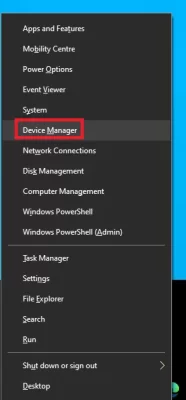
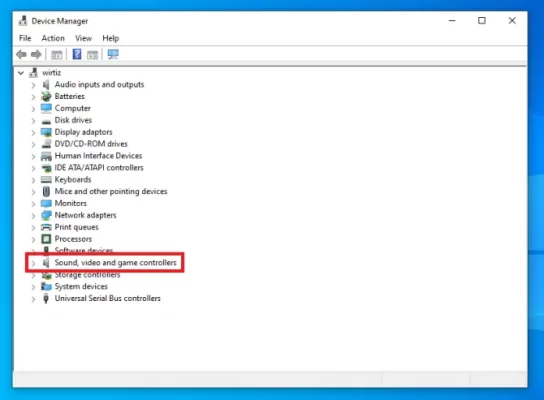
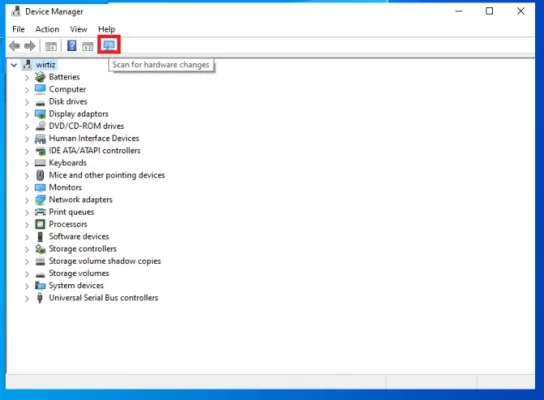
- Press Windows + X and open Device Manager from the quick start list.
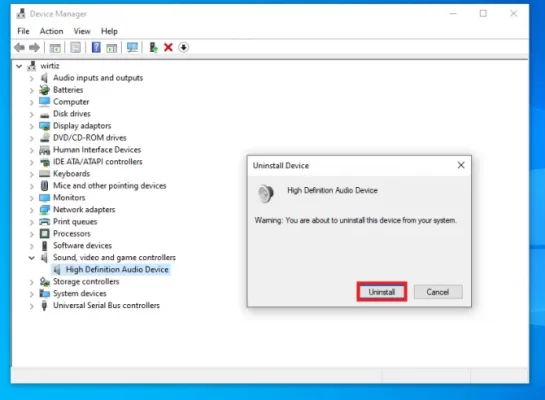
- Go to the Sound, video, and game controllers categories. Right-click on your device, then choose Uninstall.
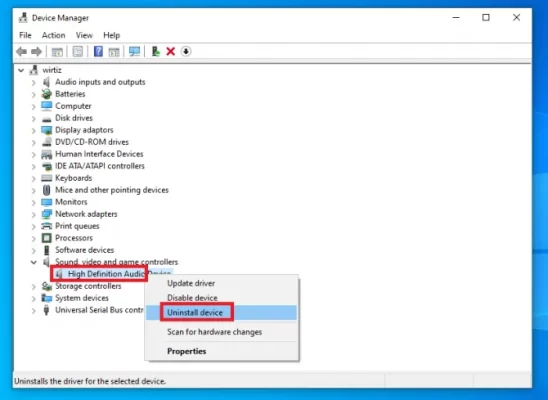
- In the pop-up dialog, click Yes.
Your computer needs a fresh start, so don’t forget to give it one!
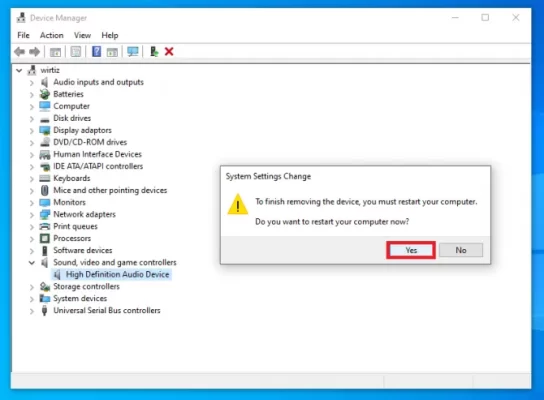
- After you’ve successfully uninstalled your audio device, click the small icon to get a hardware check. Your computer will discover the sound card without its driver and work to install the pre-set one!
Restart your computer.
Troubleshoot the problem by taking a look at whether this fix was successful – if not, move onward and attempt another solution.
Install Realtek or High Definition Audio Device
If you’re receiving an error, consider swapping out your IDT High Definition Audio Codec with another sound system. Not only could this help solve the issue at hand but also potentially improve overall audio quality!
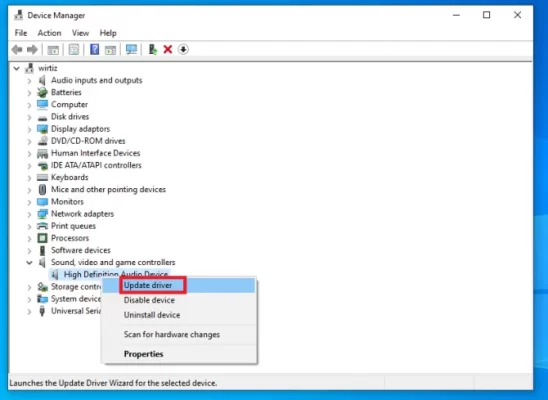
- Press Windows + X and open Device Manager from the quick start list.

- Go to the Sound, video, and game controllers categories.

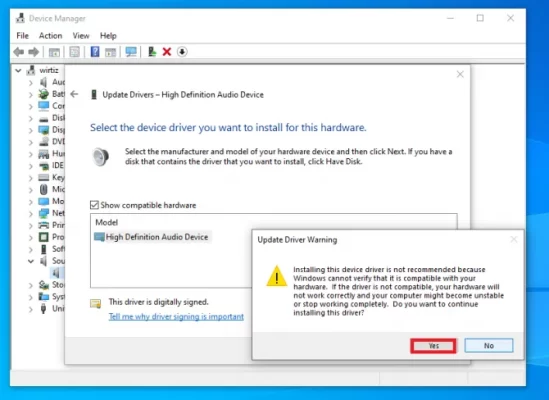
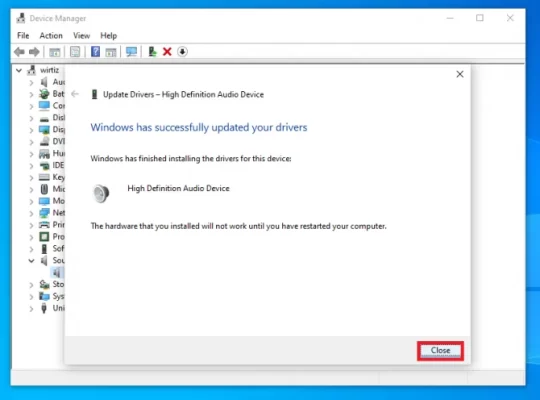
- Unlock the power of your sound device by clicking right and selecting Update Driver. A dialog will appear, giving you access to driver software that’ll take audio performance to a new level!
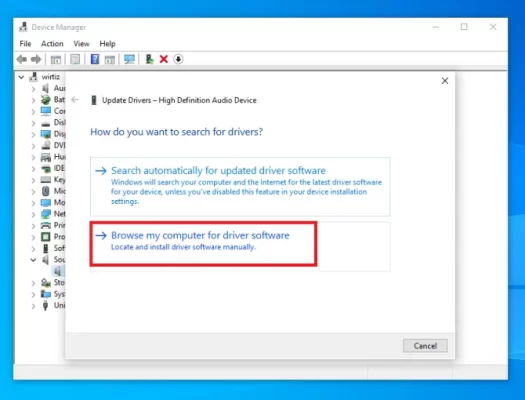
- With a few clicks of the mouse, I can select from an array of drivers to get my computer running at its peak performance.
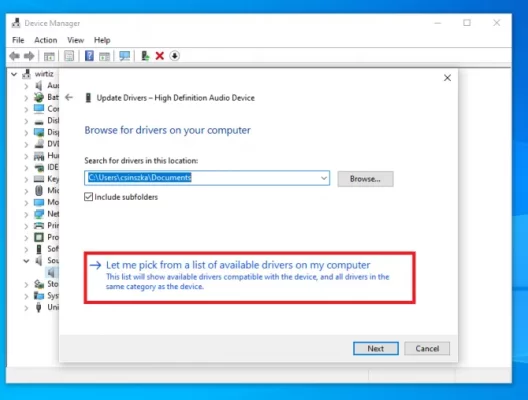
- To get the most out of your sound system, make sure to click Show compatible hardware and select High Definition Audio Device. Then proceed with a Next for an optimal audio experience!
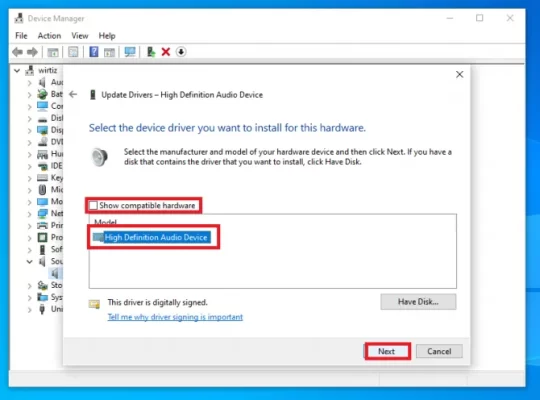
- Getting your computer set up is easy and hassle-free! Just follow the directions and before you know it, you’ll be ready to go. Once installation is complete, don’t forget to restart for a fresh start.
If all else fails, it’s time to take a trip back in the past with Windows Restore or start fresh and install anew.
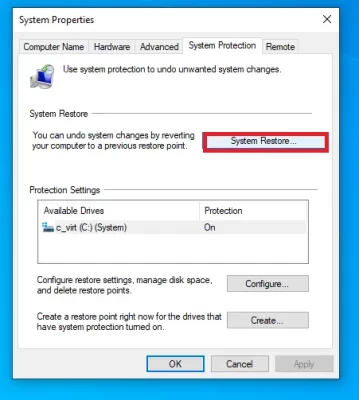
Restore from Restore Point
Take the proactive approach: safeguard yourself and your data by ensuring you have a backup copy before taking any steps forward. Be vigilant; it only takes one moment of carelessness to permanently lose valuable information!
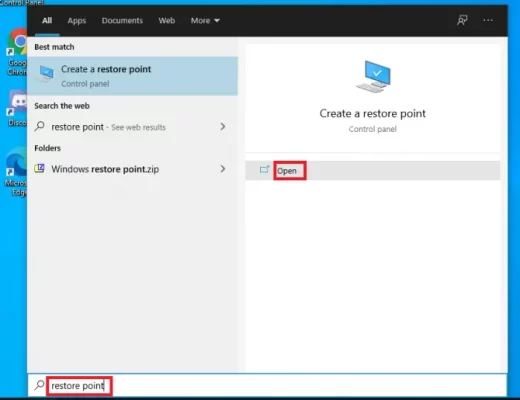
- Enter “restore point” in the Search bar to access an easy-to-use control panel with a single click, allowing you to restore your machine as though time had never passed.
- Take control of your computer and undo any missteps with System Restore. With just a few clicks, you can turn back the clock on Windows to restore its optimal state!
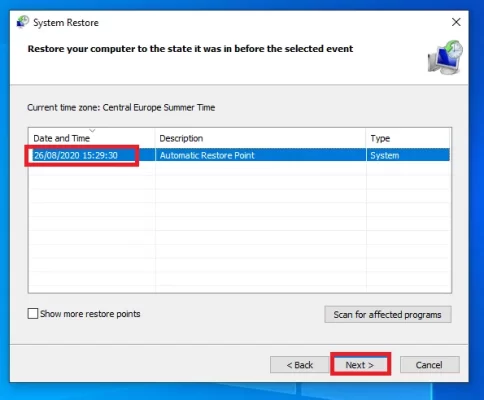
Let the wizard be your guide! Follow each step until you arrive at a list of magical restore points.
- Navigate to the most recent recovery point, when your audio was still going strong! Then hit ‘Next’ and prepare for a sonic revival.
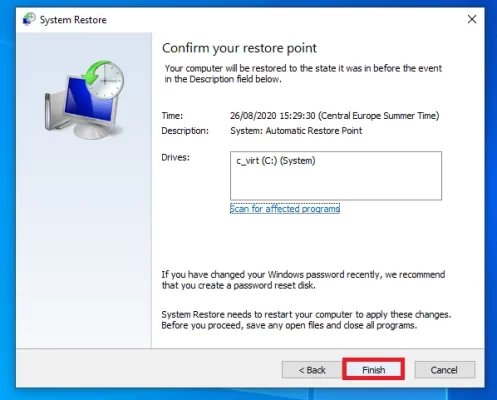
- Ready your computer for a transformation! With just one click of the Finish button in the dialog box, you can initiate a system restore and take advantage of its powerful restoring capabilities.
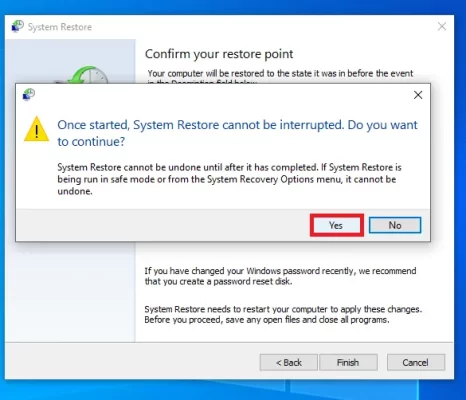
- To confirm the restore, accept your fate and click Yes in the dialog box!
For those stuck in a tech conundrum, sometimes the only solution is to start fresh. A clean installation can do just that – wiping your system of all its digital dirt and allowing you to move forward again!
Bear in mind that this will erase all your files, so you should make a backup before you proceed.
- Go to Microsoft site and click on the Download tool.
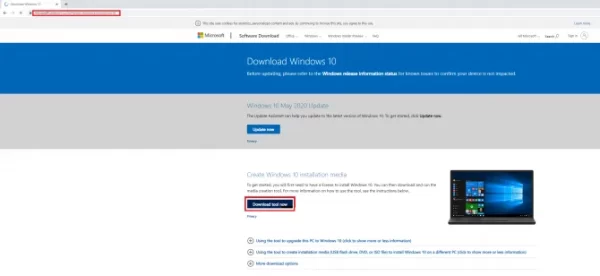
- When given the chance, make sure to select Save and save away the MediaCreationTool1903.exe file for future use!
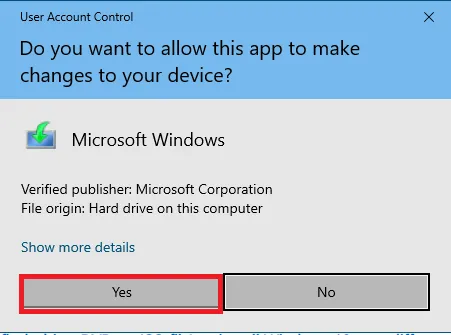
- Run the file.
- Click Yes, if User Account Control is asking you to confirm.
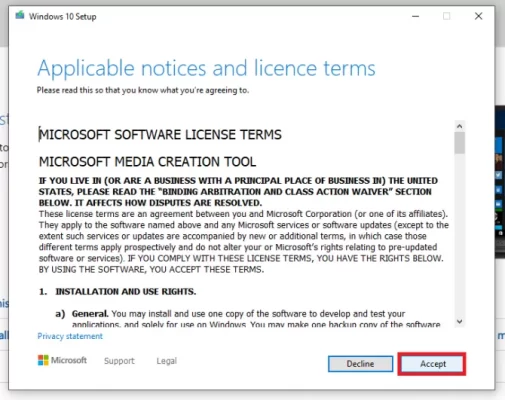
- Click on Accept to accept the terms and conditions.
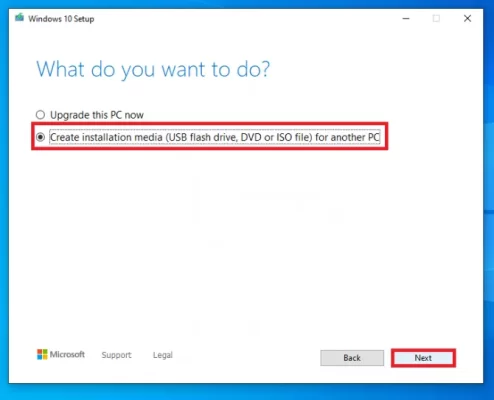
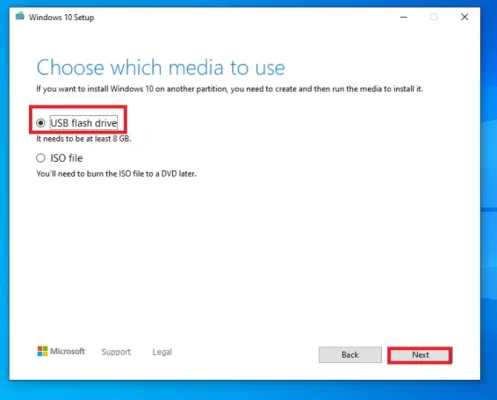
- Choose to Create installation media (USB Flash Drive, DVD, or ISO file) for another PC then click Next.
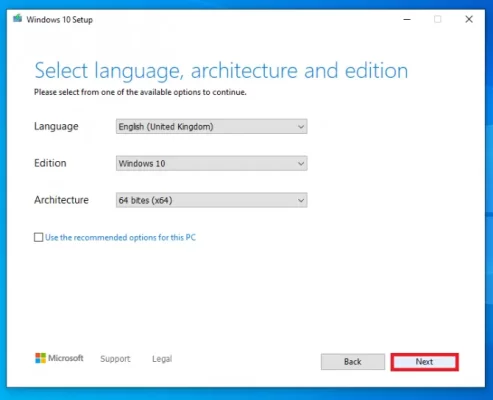
- Make sure you choose the right language, architecture, and edition of Windows 10 – this will be your key to unlocking all its features! Take one small step towards progressing forward by clicking ‘Next‘.
- Choose USB flash drive then click Next.
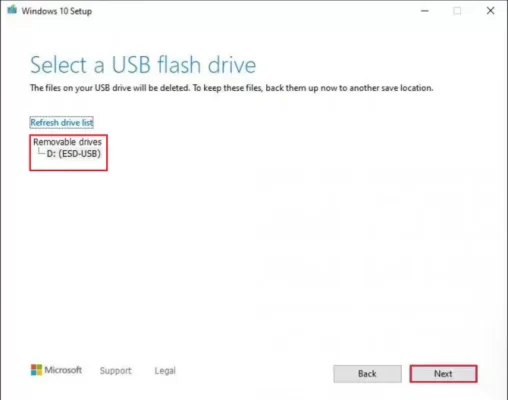
- Select the ideal USB flash drive for your project and click ‘Next.’ Allow enough time to pass until its contents are fully loaded, then wrap it all up with a neat bow by clicking ‘Finish!’
Get your boot sequence ready – we need to switch the settings for our USB drive to do its magic and get the installation process underway!
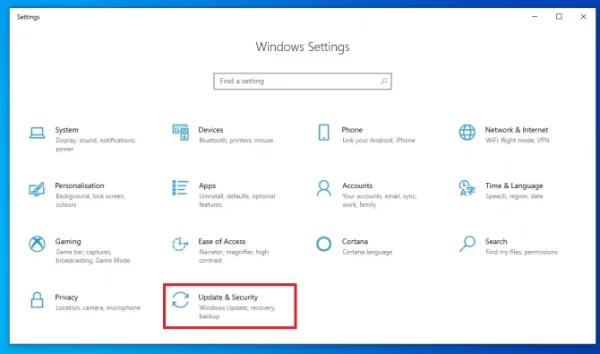
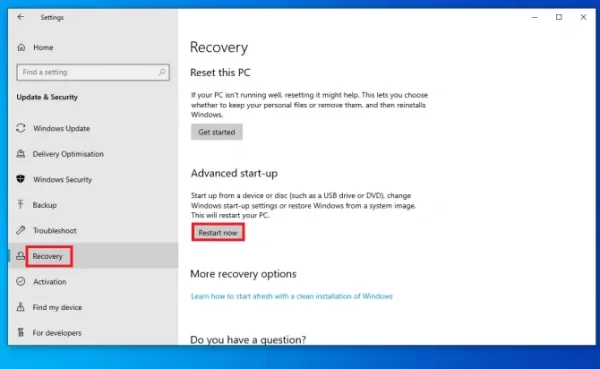
- Press Windows + I to open Settings. Choose Update&security.
- Select Recovery. Under Advanced startup, click Restart now.
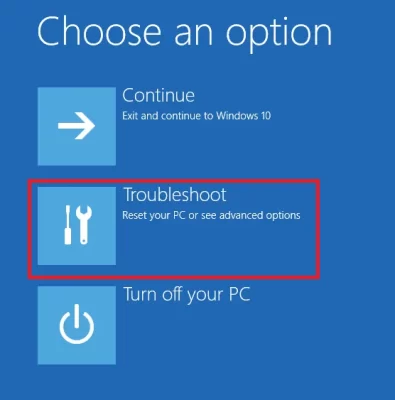
- On the screen that comes up, click Troubleshoot.
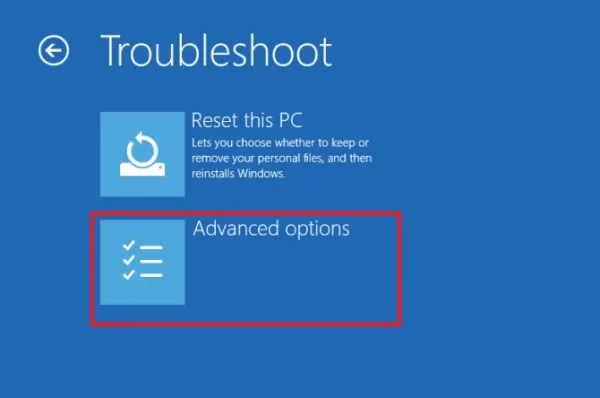
- Choose Advanced options.
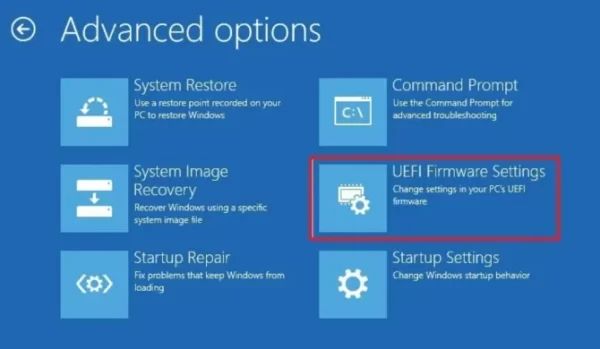
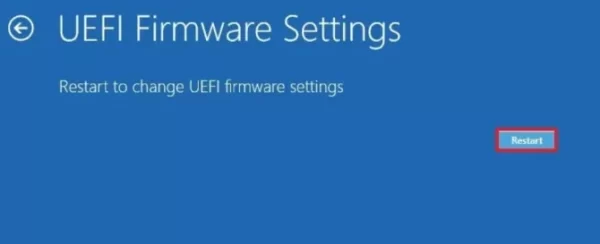
- Choose UEFI Firmware settings.
- Click Restart.
- Under Boot settings, click Change boot order. Arrange them so USB is the first.
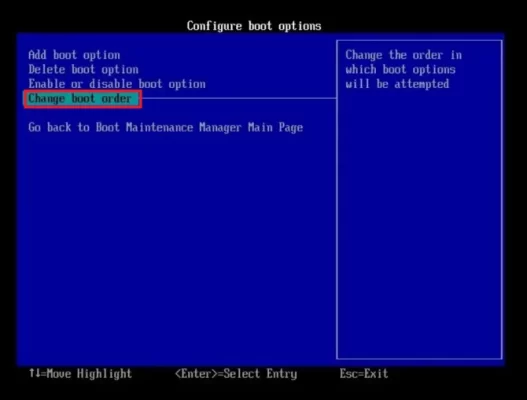
- Click Save settings.
Ready to jumpstart the installation? Let’s disconnect any extra parts such as printers, mice, and keyboards – then you can fire up your computer for a successful setup.
- Press any key to boot.
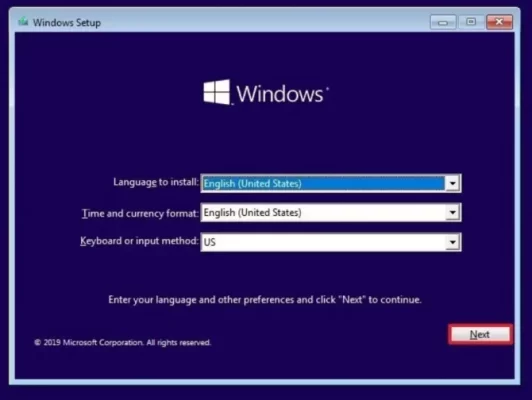
- When the Windows setup window appears, click Next.
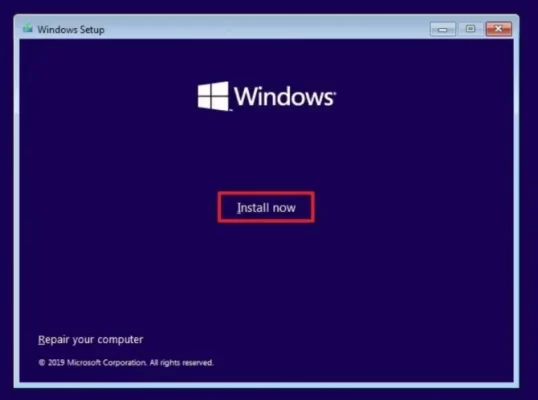
- Click Install now.
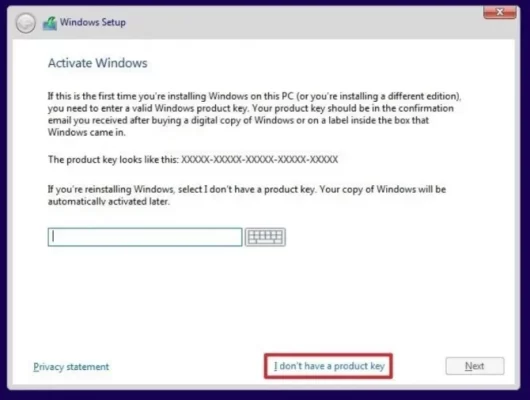
- Choose I don’t have a key on the upcoming dialogue box – you’ve previously activated this system so your existing product license will apply. Click ‘Next‘ to continue!
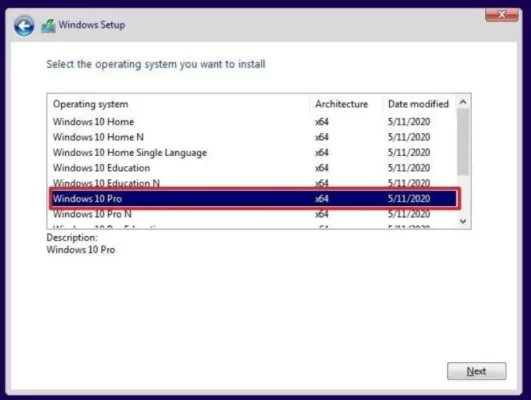
- Select the edition of Windows you have, then click Next.
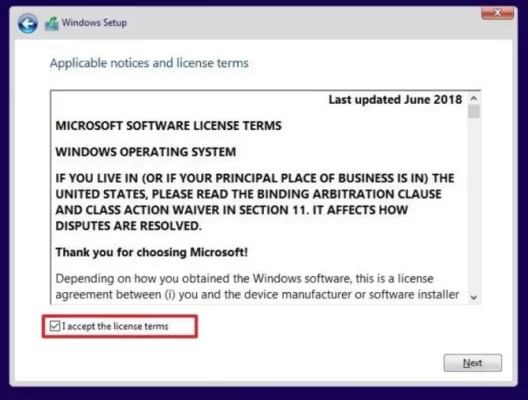
- Check the box next to I accept the license terms, then click Next.
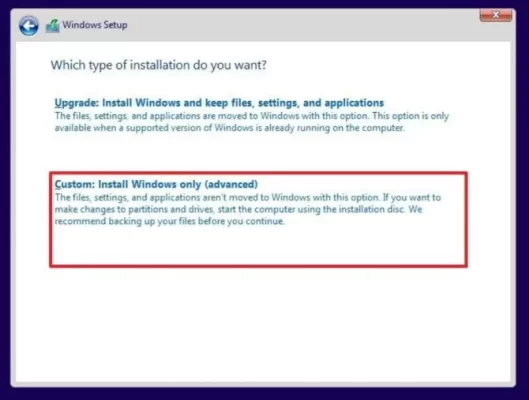
- Make your PC experience tailored to you with a custom installation of Windows! Unlock the full potential and take control by selecting ‘Install Windows only’ from the Advanced Options.
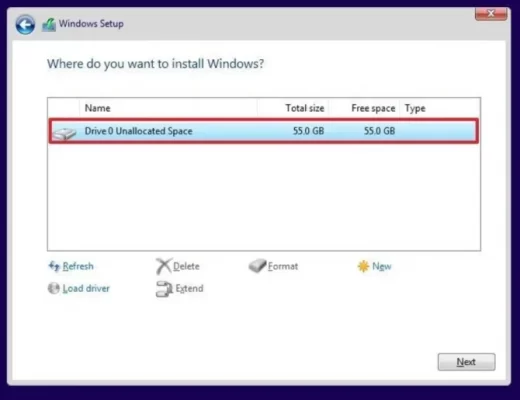
- Erase the Primary drive, otherwise known as Drive 0. All existing partitions must be wiped so Windows can utilize all of its space to craft what you need.
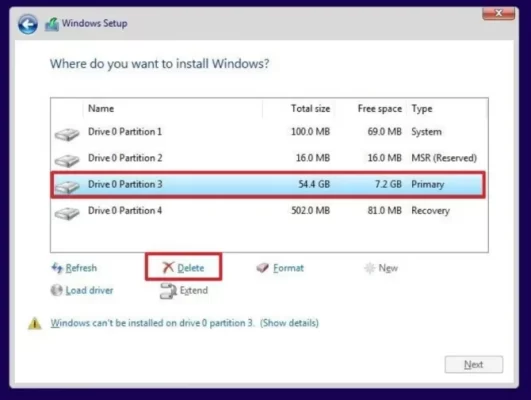
- Select the empty drive (Drive 0 Unallocated Space), then click Next.
The setup process is underway, so let’s get things moving!
Conclusion
Not having audio services running can be incredibly frustrating, so we hope our tips came in handy to prevent any need for drastic measures!