Having trouble getting your Node.js project off the ground? You’re not alone! Commonly, users run into an “npm command not found” error when attempting to install npm repositories in their projects. If this sounds familiar to you, read on for insight and solutions regarding JavaScript, Node.js, and npm errors across all three main computer operating systems: Windows, Linux, or macOS (with step-by-step instructions included!). Don’t let pesky coding snafus get between you and success – check out this article before moving forward with your amazing idea today!

JavaScript, Node.js, and npm
npm is the go-to package manager for JavaScript, made possible by the Node.js interpreter! This incredible repository stores and distributes open-source or paid projects from developers all over the world – allowing any member of a development community access to useful tools that can be incorporated into their codebase.

In the last decade, JavaScript has solidified itself as a premier coding language for modern web applications. Advances in frameworks like Vue and React have made it easier than ever to work with HTML5 technology; developers now possess an abundance of preexisting code libraries that can be implemented quickly – freeing up resources for custom content building instead!
Node.js is widely recognized as the go-to runtime environment for back-end application development due to its remarkable ability to handle hundreds of calls simultaneously without any waiting time. Developed in 2009 using Google’s V8 JavaScript engine, it has since been embraced by some of tech’s biggest names such as Amazon Web Services (AWS), Walmart, Yahoo!, Microsoft, PayPal, and Netflix – representing a staggering 33% share in web services!
What causes the ‘npm command not found’ error?
This piece dives into solutions for various operating systems, providing an easier way to find the answers relevant to whatever system you might be using. While causes may be similar across different platforms, methods of resolution vary from Windows and Linux to Mac – giving readers a tailored approach based on what they need!
Four main causes can trigger the ‘npm command not found error:
- An npm package manager is not installed
- Installing Node.js on Windows usually includes the npm package manager, but if you chose a custom installation and neglected to include it then you may find yourself without this helpful tool!
- If you’re running a Linux distribution and haven’t installed npm, that annoying error message isn’t going away until npm is up and running. Don’t worry though; once it’s in your system, using the Node Package Manager has never been easier!
- PATH and system variables are not set correctly
- For a smooth experience when installing Node.js on Windows, make sure to select ‘Add to PATH’ during customization – otherwise, you may run into issues down the road with your PATH variables!
- Outdated version of Node.js
- Outdated versions of Node.js can be a recipe for disaster, as they may cause commands from the npm package manager to fail and disrupt your workflow.
- A permission issue is preventing the use of npm commands
- For Mac and Linux users, grant yourself the proper permissions to make sure your npm directory is running smoothly!
How to solve the ‘npm command not found an error
Windows Operating System
Are you trying to run npm commands but suddenly finding yourself facing the dreaded “command not found” error? Don’t worry – this is a common issue for Windows users, especially those running older versions. If you’re on Windows 10 though, then help is at hand with these easy-to-follow steps that can get your environment back up and running in no time!
1. Verify/Install Node.js and npm
Before diving any deeper and testing other fixes, it’s critical to make sure that Node.js and npm are properly in place on your computer!
- Right-click on the Windows icon on the taskbar. Select Windows PowerShell (Admin).

- Enter “node -v” and Windows Powershell will print the Node.js version number.
- Enter “npm -v” to print the npm version number.
- If both of the above commands report version numbers, then Node.js and npm are on your system.
- Ready to install Node.js on Windows? Just download the installer, run it and follow its instructions—it’ll take care of all your needs in no time! Npm package manager will be installed with Node.js along with helpful online documentation shortcuts plus automatic PATH inclusion so you can access everything right away!
2. Check PATH and system variables
Get your system and Node.js set up just right! Make sure to double-check that all of the necessary environment variables are properly configured before you start coding with Windows, so everything runs smoothly.
- Click on the Windows icon on the taskbar and search the environment variable. Click open for the option listed as Edit the system environment variables.
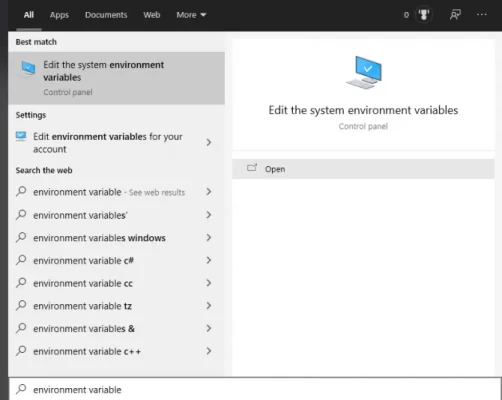
- The System Properties window will open. Select the Advanced tab and then Environment Variables…
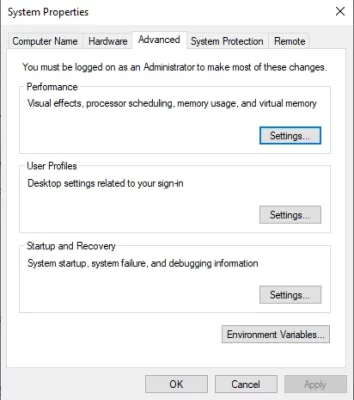
- In the Environment Variables window, under System variables, select Path, then Edit…
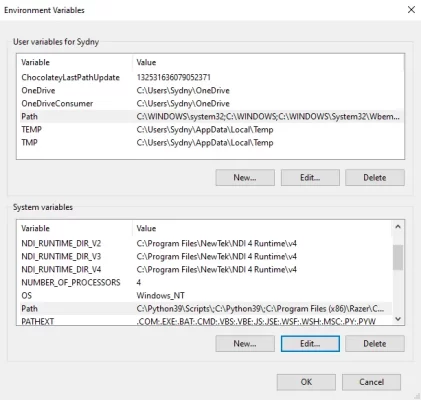
- Search the list for C:\Program Files\nodejs. If this path doesn’t exist, you need to create a new one.
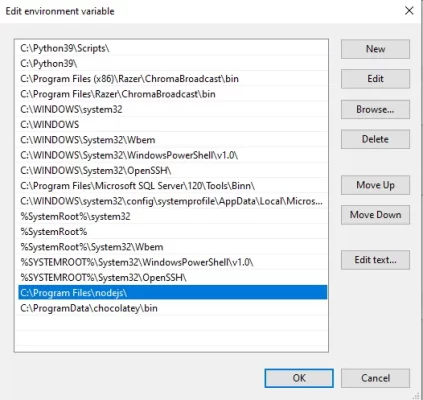
- Click New…, then input a Variable name. For the Variable value enter “C:\Program Files\nodejs“. Now click OK.
3. Update Node.js
Upgrading Node.js to the newest version is essential for a worry-free experience – outdated versions can be detrimental to your system, leading to major problems down the line. So make sure that you’re up-to-date and take advantage of all of the benefits!
- Right-click on the Windows icon on the taskbar. Select Windows PowerShell (Admin).
- Run the following commands to update Node.js and npm:
- Set-ExecutionPolicy Unrestricted -Scope CurrentUser -Force
- npm install -g npm-windows-upgrade
- npm-windows-upgrade
- After any packages install and update, check your version of Node.js to ensure it’s updated by entering “node -v“.
Linux Operating System
With Linux’s expansive range of distributions, it can be overwhelming to decide which one is right for you. One clear top choice: Ubuntu! Its impressive market share and long history since 2004 make it a reliable operating system. Solutions may vary slightly among other popular distros like Manjaro, Mint, and Red Hat – but much stays the same if you choose to go with Ubuntu 20.04 specifically. It has all you need!
Are you experiencing the “npm command not found” when using Ubuntu? Don’t worry – there are four ways to get your project back on track. From upgrading Node with apt-get and reinstalling npm packages through nvm, this error can be solved quickly so you can start coding again!
1. Install Node.js and npm
Installing Node.js and npm on Ubuntu is fairly simple:
- Ready to take control of your computer? With a few simple keystrokes or just two clicks, you can open up a world of possibilities with the terminal. Unleash its power and explore new ways to use Linux by pressing CTRL+ALT+T at once, or search for ‘terminal‘ in the Activities menu!
- Type the following commands:
- sudo apt update
- sudo apt install nodejs npm
- Once your packages have successfully been installed, you can ensure that Node.js and npm are set up correctly by entering them into the command line – it’s easy to double-check!
- node –version
- npm –version
2. Check PATH and system variables
Now that you’ve made sure npm’s been properly set up on your machine, let’s check the path for its command and make sure it’ll run accurately.
- Open a terminal window by pressing CTRL+ALT+T simultaneously. Alternatively, you can navigate to the Activities menu and search terminal, then click on the resulting icon for a terminal.
- To check the current path for npm commands enter “which npm“.
- The /etc/environment file needs to be checked for the file path from above, which may look something like /usr/bin/npm. Enter “cat /etc/environment“.
- Unlock the secrets of your environment variable with this awesome readout! Need that file path from step two? No worries – if it’s not there, you can always add an npm path to get what you’re looking for.
- To edit the /etc/environment file enter “vi /etc/environment“.
- To complete the setup, add a colon and the npm path you acquired in step 2 to your environment variables. This file should end at ‘bin’; make sure it is placed before those final quotation marks!
- Enter “source /etc/environment” to reload the file with the changes.
3. Give User Permission to Run Commands
With Linux, your applications benefit from a secure environment. However, this also means you may run into interference with how programs work as most apps only possess limited permissions. Want to give yourself full access when it comes to editing node modules and npm? No problem! Just follow these steps…
- pen a terminal window by pressing CTRL+ALT+T simultaneously. Alternatively, you can navigate to the Activities menu and search terminal, then click on the resulting icon for a terminal.
- Enter “sudo chown -R $(whoami): admin /user/local/lib/node_modules/“.
- Attempt to run an npm command and see if the problem reoccurs.
4. Update Node.js
Stuck on an old version of Node.js? Don’t worry – you can easily upgrade to the latest release with npm! Upgrade now and take advantage of all the newest features.
- Open a terminal window by pressing CTRL+ALT+T simultaneously. Alternatively, you can navigate to the Activities menu and search terminal, then click on the resulting icon for a terminal.
- Enter “sudo npm cache clean -f” to clear your current cache so that there are no problems accessing the correct file path if you changed it in the second solution.
- Now enter “sudo npm install npm@latest -g“.
- You can verify that Node updated to the latest version by entering “npm -v“.
MacOS
1. Install Node.js and npm
If you’re a Mac user and don’t have Homebrew yet, now’s the time to get it! Not only is this package manager highly popular – making installation of programs quick and simple – but with just one download you’ll also be able to easily install Node.js & npm on your computer too. Here we provide all the necessary steps so that in no time, your computer will thank you for taking advantage of such an incredible tool set!
- Click the Launchpad icon in the Dock, then search for Terminal. Click the result for Terminal.
- Type the following command into your Terminal window to install Homebrew:
- /bin/bash -c “$(curl -fsSL https://raw.githubusercontent.com/Homebrew/install/HEAD/install.sh)”
- Then enter:
- brew update
- brew install node
- To verify that both are installed, enter “node -v” and “npm -v” to confirm the version of both Node.js and npm.
- Check if the ‘npm command not found’ error remains.
If you’re on macOS, there’s an easy way to get Node.js up and running – just use the installer specifically formulated for it!
2. Check PATH and system variables
On macOS, npm lives in a secure spot under the /usr/local/bin directory. To make sure it’s properly set up for your system, take a look at that PATH variable!
- Click the Launchpad icon in the Dock, then search for Terminal. Click the result for Terminal.
- Into the terminal enter echo $PATH, to display your PATH variable.
- Now enter “npm get prefix“. Compare the two outputs. Most likely the npm get prefix command will report /usr/local/bin. This should also be found in your PATH variable.
- If the prefix is NOT found in the PATH variable, it needs to be set. To set your PATH enter “export PATH=”[prefix]/bin:$PATH” >> ~/.bash_profile“. [prefix] is the value returned in step 3. Now enter “source ~/.bash_profile“.
- Check to see if the ‘npm command not found’ error is now resolved by trying the same command that failed previously.
3. Give User Permission to Run Commands
Donning their shared resemblance, MacOS and Linux play a game of cat-and-mouse when it comes to editing node modules. Usually, you find yourself needing explicit permission to bypass the error, allowing your edits through like an all-access pass!
- lick the Launchpad icon in the Dock, then search for Terminal. Click the result for Terminal.
- Enter “sudo chown -R $(whoami): admin /user/local/lib/node_modules/“.
- Attempt to run an npm command and see if the problem reoccurs.
4. Update Node.js and npm
Installing the latest version of Node.js is a cinch if you’ve got Homebrew or another package manager under your belt, such as Nvm or N. If not, no worries – simply head over to the Node.js website and grab their newest installer while following its default installation settings; don’t choose custom install unless you’re an experienced user!
- If you have Homebrew, click the Launchpad icon in the Dock, then search for Terminal. Click the result for Terminal.
- Enter “brew upgrade node“.
- That’s it! Double-check by entering “node -v” and “npm -v” to ensure you are up-to-date.
Key Takeaway
Developing an app without having access to essential directories like npm can be a huge obstacle, as it cuts you off from the helpful Node.js libraries that would otherwise make coding easier and faster. Unfortunately “npm command not found” is just one of those roadblocks on your programming journey – but there are still ways for you to push forward!
This article is here to make your life easier by providing tailored solutions for the operating systems you use – Windows, Linux and MacOS. No more wading through irrelevant information; just clear answers that will help get you back on track in no time!
Are you having trouble getting your Node.js and npm up-and-running? It could be one of four common issues, from an outdated installation to path or permission conflicts – but luckily most solutions are easily implemented! Even if you’re a beginner when it comes to command line commands, our how-to guide should help get the job done quickly. Have any other insights on solving this issue? Let us know in the comment section below so we can make sure everyone has the tools they need for their projects!