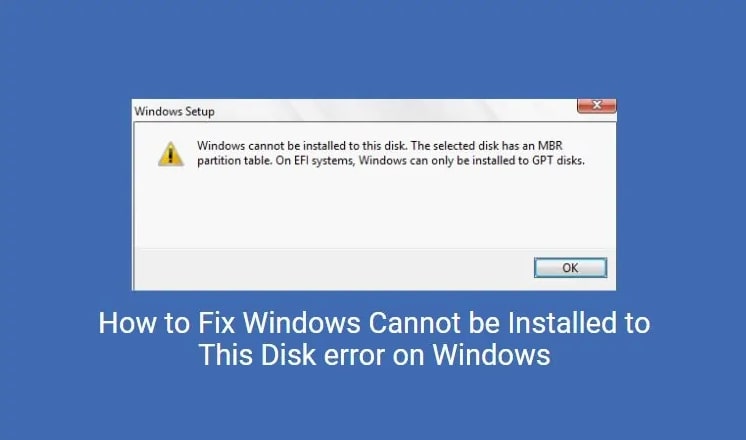
Installing the latest Windows can be a breeze. But for some, an error message appears – “Windows cannot be installed on this disk”. It turns out that your hard drive’s partition style must support both UEFI and Legacy BIOS versions to properly install it. This article provides insight into why GPT or MBR-supported partitions might cause problems and also presents means of getting around them!
Understanding How UEFI/BIOS Legacy Versions Impact Windows Installation Setup & Your Hard Drive Partition Style
While your computer might seem like an inscrutable entity, hidden beneath the surface is a complex network of two low-level software pieces working in tandem to make sure your machine starts up and runs smoothly.
- Lurking beneath the exterior of your computer is an intricate collaboration between two hidden layers, operating with unparalleled synchronicity to ensure a seamless startup and running experience.
- BIOS, an old operating system, has reached its limit as it can only boot from hard drives up to 2TB and struggles when loading multiple pieces of hardware at once due to a 16-bit processor mode and 1MB executable space. This hinders the speed of start-up times more than modern systems do.
Your motherboard is home to the two essential elements that get your computer up and running – without them, you wouldn’t be able to access your PC. One of these magic ingredients acts as an alarm clock for all the hardware attached; hard drives with Windows Boot Executable included! The other ensures smooth sailing once everything has been awoken from its slumber, allowing us entry into our installed operating systems.
Your hard drive can only accept a Windows installation if it’s compatible with your version of software – UEFI or BIOS. These two systems are incompatible, so make sure you use the right partition style before attempting an install!
Which Partition Style Works With Which Firmware?
If you’ve encountered the frustrating “Windows cannot be installed to this disk” error, chances are it’s because of confusion between two common partition styles: GPT and MBR. While installing Windows on EFI systems only works with GPT disks, thankfully there is an easy way to distinguish which style has been paired with your machine’s firmware. Find out how below!
- Many Windows users have encountered the dreaded “Windows cannot be installed on this disk” error. This happens when your motherboard supports only Legacy BIOS mode, which limits you to installing on an MBR hard drive partition as the GPT style is unrecognizable by a traditional BIOS system.
- Installing Windows on a new computer can be confusing if you’re presented with this error message – “Windows cannot be installed to this disk. The selected disk has an MBR partition table”. This is because Microsoft requires that computers using the newer UEFI software must use GPT-style disks in order for Windows to properly install and run.
Armed with newfound knowledge of what type of firmware is compatible with each partition style, we can tackle any installation issues that come our way by applying the solutions appropriate to every error.
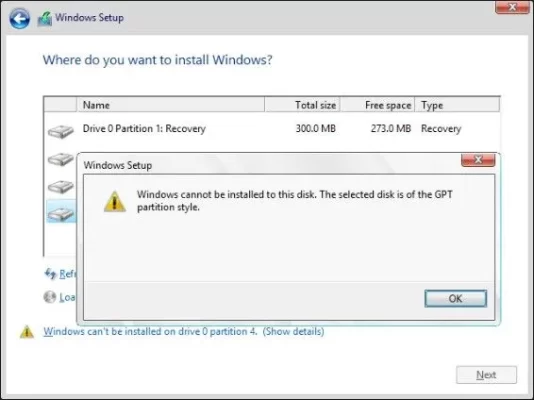
Solutions to “Windows Cannot Be Installed to This Disk. The Selected Disk is of the GPT Partition Style.”
If you’re trying to install Windows but get an error warning that it “cannot be installed on the disk,” take a closer look and make sure your BIOS only has legacy mode available. If so, you’ll need to convert the drive! Doing this will enable the successful installation of Windows.
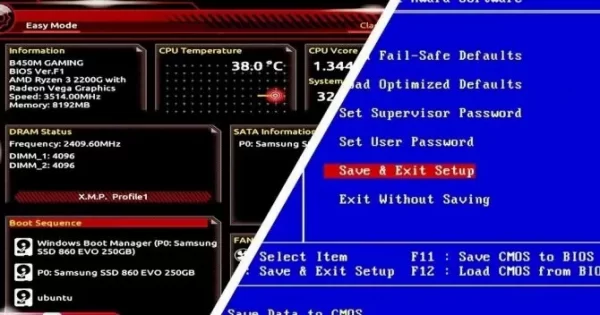
1. Check BIOS Setup
Unlocking the BIOS will give you access to a range of settings and configurations that can help optimize your computer’s performance.
- Reboot the computer.
- Get ready to take control of your computing experience! To enter the BIOS, simply locate and press the key designated in your motherboard’s manual. From there you can customize fun settings or access powerful tools that will allow you to get even more out of your device!
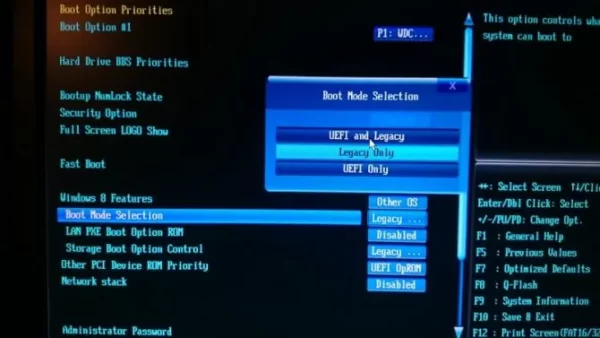
- Whether it’s the BIOS or its notorious “Boot” tab, navigating through them can be quite tricky. But with a bit of sleuthing, you’ll soon uncover an option that reveals which boot mode your device is in – a treasure trove!
- To access an advanced boot mode like UEFI, a GPT disk partition needs to be converted to an MBR – giving your system the boost it craves.
- Need to install Windows on a hard drive? Select the UEFI/Legacy Boot option and hit save. Now your desired drive is ready for an OS installation!
2. Convert to MBR Using Diskpart
If your computer is brand new, using the Diskpart tool to install Windows won’t be a problem. However, if you have existing files on your hard drive already, it’s best to start with a completely clean slate and use an alternative one instead!
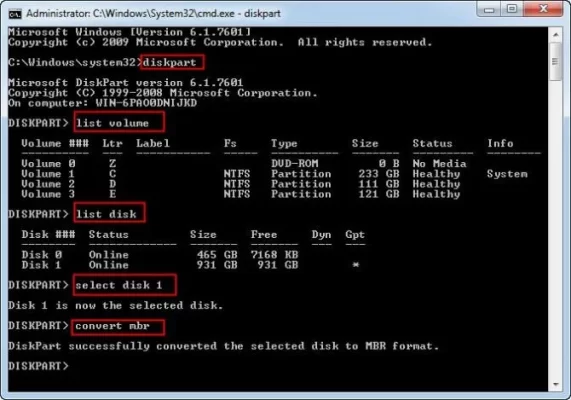
- Insert the Windows Installation Media Disk and during setup, open up your computer’s Command Prompt. Press Shift + F10 to do this.
- Enter the following command: diskpart [enter].
- Enter the following command: list disk [enter].
- A list of all of your available hard drives will pop up.
- Select the drive you want to install Windows to. Normally this is disk 0. If it is not disk 0, make sure to choose the appropriate disk.
- Enter: select disk 0 [enter].
- Type in: clean [enter].
- Type in: convert MBR [enter] to convert the drive to MBR.
- Type in: exit [enter]
To finish the task, simply press Enter!
3. Use the Disk Management Utility to Convert to MBR.
If you want to utilize the power of two operating systems, dual booting is a great way to get started. The Disk Management Utility can help make this process easy and efficient; it allows users to quickly convert hard drives into MBR format so that both OSes are up and running in no time!
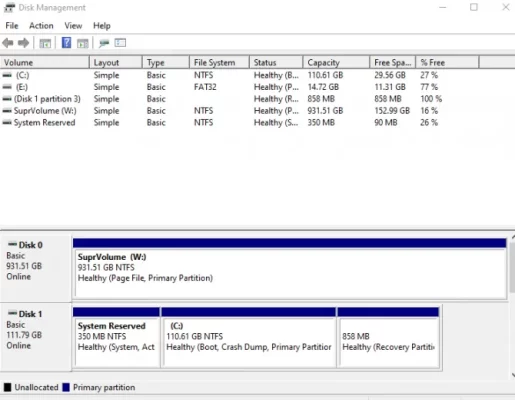
- In your computer’s search bar, type in “Disk Management”.
- On Windows 10, the program in the search will be called “Create and Format Hard Disk Partitions – Control Panel”. Click this to get to the Disk Management Window.
- Find the GPT disk in the volume list.
- Delete all of the partitions/volumes on this disk.
- Right-click each and choose delete volume.
- With no more room taken up by allocated files, give your disk a transformation – right-click to transform it into an MBR Disk and experience the amazing new possibilities!
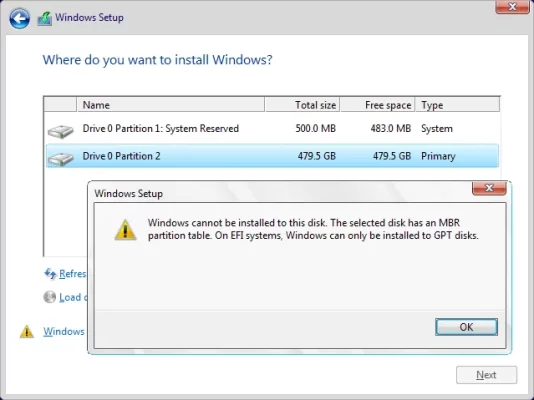
Solutions to “Windows Cannot Be Installed to This Disk. The Selected Disk Has an MBR Partition Table.”
If you are receiving the dreaded error message when attempting to convert your hard drive from MBR to GPT, don’t despair! There’s more than one way around this issue – try out a few different solutions and you’ll be back up in no time.
1. Jump Into BIOS & Disable EFI Boot Sources.
If you’re looking for a fast and easy solution to your error woes, why not consider disabling EFI boot sources? Just make sure to take a trip into the BIOS first – it may be just what’s needed!
- Reboot your computer.
- To access the BIOS, tap away at your keyboard until you locate that magical key. It’s often DEL or F2 according to most motherboard manuals – perfect for unlocking a range of settings and configurations!
- Locate the Boot Order Section and see if you can disable EFI boot sources.
- Save changes.
- Now try installing Windows again.
After Windows has been successfully installed, it is important to go into the BIOS and reactivate EFI boot sources – this will ensure that your computer continues running smoothly.
2. During Installation, Delete Partition & Reformat.
If you’re looking for a solution that will erase your essential data, think carefully before taking the plunge! Unless you are willing to part with those important files or have already made an extra copy in case of emergency, this fix may not be right for you.
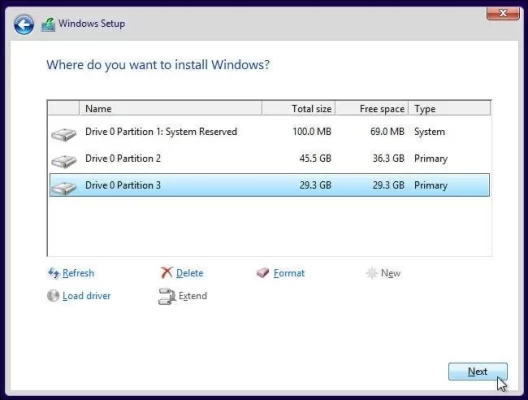
As you prepare to install Windows, you’ll reach a pivotal moment: deciding which hard drive to use for the OS. To ensure success on UEFI systems, it’s important to select your chosen partition and delete its existing structure before creating an entirely new GPT-style one from scratch!
3. Use Diskpart or Other Mode in BIOS.
With Diskpart, you can quickly and easily eliminate a troublesome partition by converting it to the GPT style. Simply follow the same steps as above but alter them slightly – simply type “convert gpt [enter]” instead of “Type in: convert MBR [enter].” Now your drive will be successfully converted to GPT!
Unlock the power of your computer without the hassle: check your BIOS for a dual option to switch between UEFI and Legacy Boot modes, then simply disable UEFI and reboot using Legacy to install directly onto your disk! No conversion is necessary.
4. Use a 2.0 Flash Drive for Installation.
Upgrading to Windows just got easier! With a 2.0 USB flash drive, you can choose the best boot method option – MBR or Legacy – making installation fast and efficient without any extra accessories needed. Look no further for your upgrading needs: 2.0 is where it’s at!
Are you running a new motherboard? If so, it may be equipped with support for both UEFI and Legacy Boot modes. You can find out by using your BIOS – follow the above-mentioned tips to check! When attempting to install from disk, don’t press anything when prompted–just wait until the message appears again before pressing “any key” to select which device should boot up first. That’ll get those gears rolling on that installation process!
Windows installations can be incredibly frustrating when they don’t work. But never fear – with a few tweaks, you’ll get your system up and running in no time! Sadly, installation errors are all too common – but the good news is that there’s usually an easy fix for them. So if you’re having trouble getting Windows installed to your disk drive, check out this article for some helpful tips on moving forward!