
When an unexpected error occurs while searching the web, it can be incredibly frustrating. Many us may attempt to close the browser and try again or check for any spelling mistakes in their URL – but these techniques don’t always work! For users of Google Chrome specifically, they often encounter “This site can’t be reached” errors due a website taking too long to respond, being down temporarily, or even simply a connection issue.
Are you seeing a pesky error code on your Windows computer, Mac device, or Android smartphone? Don’t let it spoil the fun! We’ve got helpful solutions to help solve this issue quickly and easily. Find out what that mysterious error code truly means and know how to prevent its return in future – all without having to switch browsers or wait any longer!
What does the “This Site Can’t be Reached” error mean?
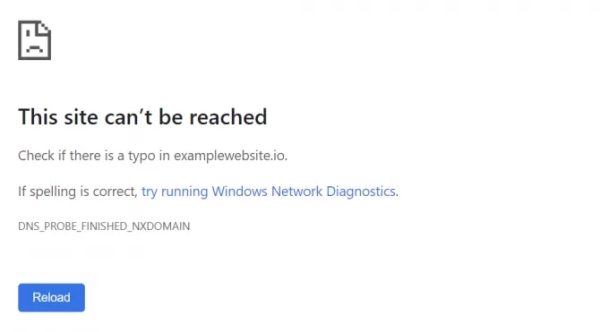
Have you ever clicked on a website link only to encounter the dreaded “domain name system (DNS) server not found” message? This could mean any number of things, from a simple typo when entering in the address to an underlying issue with your DNS. Double check that all spelling is correct, but if it isn’t there might be something wrong with your connection – and don’t worry: there are ways to fix that too!
Why do you see the “This Site Can’t be Reached” on Google Chrome?
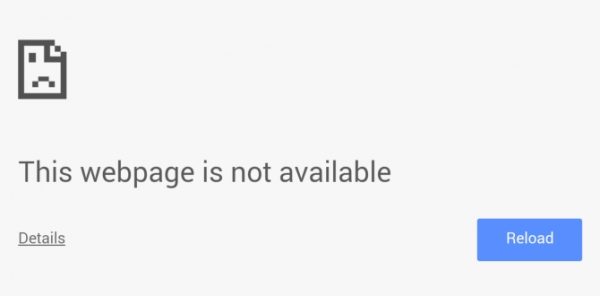
When your internet connection is experiencing problems, chances are you’ll encounter a helpful but cryptic error message. Depending on the issue at hand, it could be labeled as “This site can’t be reached” or “This webpage is not available,” giving only brief insight into what’s causing the disruption – though many solutions exist to get things back up and running again quickly!
So you have the dreaded “this site can’t be reached” error? Many times, this frustrating issue is caused by a DNS lookup failure – when your browser attempts to translate from URL domain names into IP addresses (the language of the internet), but fails. This could mean there’s an issue with misconfigurations in the system or that Windows’ own DNS client isn’t working properly.
It could be due to a number of issues, such as corrupted Google Chrome cookies, outdated wireless adapters and settings, interference from your antivirus program, or an invalid DNS cache. Fixing any one of these problems may help get your website back online!
Google Chrome enables efficient problem-solving by providing a detailed explanation of any issue you may encounter. On the same screen, below a helpful heading, one can find both an easy to understand description and identifying error code of the cause.
Typical error descriptions include:
- Domain.com’s server IP address could not be found
- Domain.com took too long to respond
- Check if there is a typo in domain.com
- Instead of “domain.com” you should see the website address you tried to access.
Troubleshooting can be tricky, but error codes are your secret weapon! While the description of an issue may lead you to some possible solutions, researching a unique code at the bottom is key. These multi-word combinations linked with underscores provide detailed plans on how best to tackle whatever problem has come up – just plug in yours and get back on track!
Struggling to access a website? Our comprehensive guides provide solutions for all the commonly encountered error codes when attempting to reach an inaccessible page. Get back on track and browse with ease!
- ERR_CONNECTION_CLOSED
- DNS_PROBE_FINISHED_NXDOMAIN
- ERR_CONNECTION_TIMED_OUT
- ERR_CONNECTION_RESET
- ERR_NAME_NOT_RESOLVED
- ERR_TUNNEL_CONNECTION_FAILED
- ERR_ADDRESS_UNREACHABLE
- ERR_CONNECTION_REFUSED
- ERR_CONNECTION_ABORTED
With the right know-how, most “this site can’t be reached” and similar errors don’t need to cause panic. This article provides a set of practical solutions that will get rid of these issues in no time!
Proven methods for fixing the “This site can’t be reached” error in Google Chrome
If you’re an Apple Mac or Android user, don’t worry – there’s still hope if you encounter this pesky Google Chrome error! You’ll find specialized methods tailored specifically for your device at the bottom of our list.
1. Check your target website’s status
When you’re encountering issues with a website, take the time to investigate whether it’s an issue on your end or if everyone is being affected. It could be due to planned maintenance, too many visitors for the server to handle, malicious hacks like DDoS attacks – but the most unfortunate cause of all is when servers fail without warning and there isn’t anything anyone can do except wait!
Looking to confirm the availability of a website? Try any one of three free online tools– WebsitePlanet, isitdownrightnow and Downdetector. Simply type in your target address into their lookup tool then sit back as they check its status for you! If it appears down from your end only, take action with other solutions available.
2. Clear your browser cache
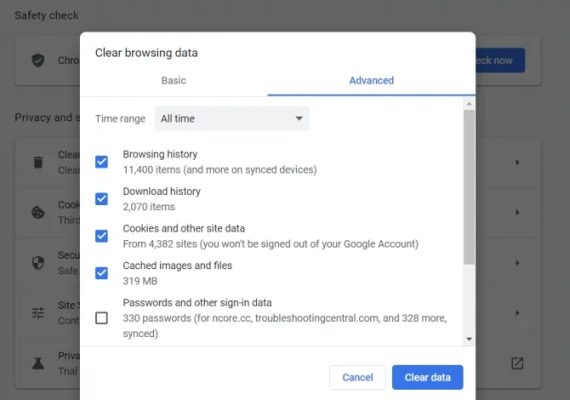
Struggling with “this site can’t be reached” in Chrome? Give cleaning up your browser cache a try — it could just solve the problem! When webpages don’t load correctly, clearing out old caches and cookies is often an effective way of getting things back on track.
- To do this, open up your Google Chrome browser on your computer, click the three dots in the top right-hand corner of the browser, choose the More tools option from the list, and then click on Clear browsing data. You can also just open up your Google Chrome browser and hit CTRL – SHIFT -DEL.
- On the Settings window that pops up, under the time range drop-down menu, choose All time as the time range and then clear out your browsing history, cookies, and cached images via the Clear data button. You may need to checkmark all of these if they aren’t already selected.
- Once you have done this, try reloading the webpage to see if the issue has cleared up.
3. Run the Windows Network Troubleshooter
For those experiencing difficulty with their wireless signal, the built-in network troubleshooter is an effective way to identify and resolve any problems.
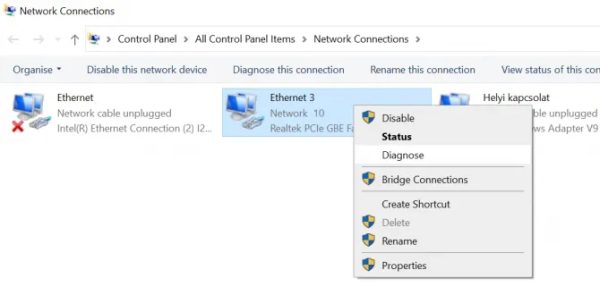
- Type “Run” into your computer’s search bar via the Start Menu and open the run program module.
- Type “ncpa.cpl” into the run program to open the network connections box.
- Find your active internet connection in the network connections window, right-click it, and click the Diagnose option.
- Give the network troubleshooter program some time to run. If the problem it finds is a “DHCP is not enabled for wireless network connection,” you will want to repair this problem as an administrator.
- Click on “Try these repairs as an administrator,” and on the next prompt, apply the fix.
- Reboot the computer to see if the issue is fixed.
4. Restart your router and modem
It’s not necessarily your device that is causing the issue – it could be as simple as a temporary momentary hiccup with your router or modem. In most cases, resetting will resolve any freezing or glitching you may experience.
To properly reset your router and modem:
- Unplug the power cables from both the router and the modem.
- Wait 2-3 minutes to let the electronic circuits completely reset.
- Plug the power cables back and wait for your router and modem to boot up. This process might take another few minutes.
- Once all the lights are up, showing that the internet connection is established, try visiting your target website again.
5. Disable conflicting Google Chome extensions
Extensions are a great way to enhance Chrome functionality, but they can also be the culprit behind browser errors. Out-of-date or low quality extensions may lead to code conflicts and disrupt regular Chrome operation – so it’s wise to temporarily disable any installed extensions while diagnosing potential issues.
- Click on the three dots in the top right corner of your Chrome window to open the menu, and under More tools, select Extensions. Alternatively, you can type “chrome://extensions/” into the address bar to open the Extensions screen.
- Your different extensions will show up on cards, each with a toggle button in the bottom right corner. Toggle off every extension that you can see on the screen.
- Check your target website to see if you can access it now. If it loads, that means that one of your extensions is the cause of the error.
- Start enabling extensions one by one, and refresh your target website every time an extension is enabled.
- When you see the “this site can’t be reached” error again, it means that the last extension you have enabled is the problem.
- Uninstall that extension and find an alternative to replace its functionality.
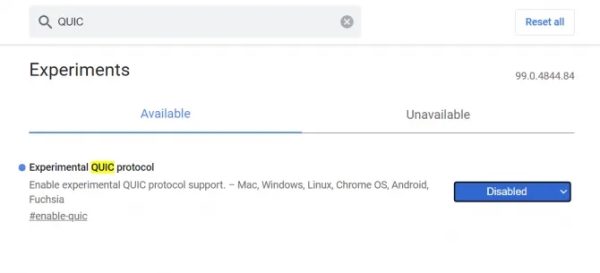
6. Disable the “Experimental QUIC protocol” flag
Google Chrome’s experimental QUIC protocol promises to reduce latency and improve connection speeds. To ensure a smooth browsing experience, the feature is enabled by default on new installations of Google Chrome. However, it can occasionally cause network issues; if this should occur users may consider disabling the protocol in order to rectify the issue.
- In a new Google Chrome window, type in “chrome://flags” to open up the Experiments screen.
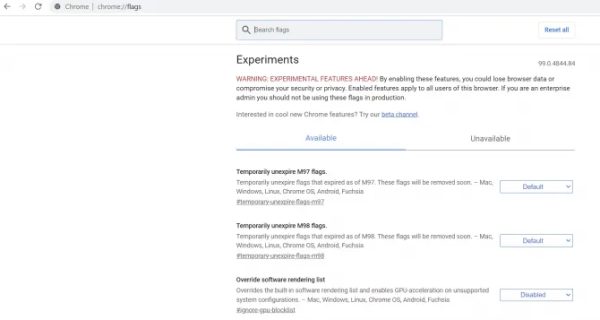
- At the top of the screen, you will see a Search flags field.
- Type “QUIC” into the search field and press Enter.
- You will see a single search result called Experimental QUIC protocol. Change the default status in the drop-down to Disabled.
- Restart Google Chrome for your changes to take effect.
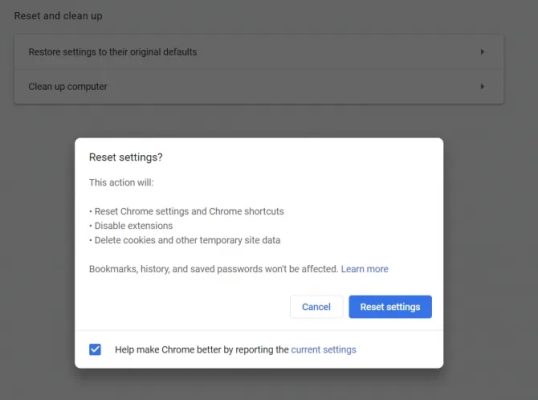
7. Reset Google Chrome
If traditional solutions to a Chrome error have failed, resetting your browser could be the answer. Doing so will reestablish settings or remove extensions which might otherwise cause recurrent issues on startup and potentially cease irritating errors from appearing.
- Open up your Google Chrome browser and click on the menu icon (3 dots) in the top right-hand corner of the browser. Choose the Settings option.
- A Settings menu will pop open. In this menu, scroll all the way down to the bottom and choose the advanced tab.
- Scroll all the way down to the bottom in the advanced menu and find the “reset and clean up” section. Choose to restore your settings to their original defaults and hit Reset settings.
- Once this is done, try reloading the webpage to see if the issue has cleared up.
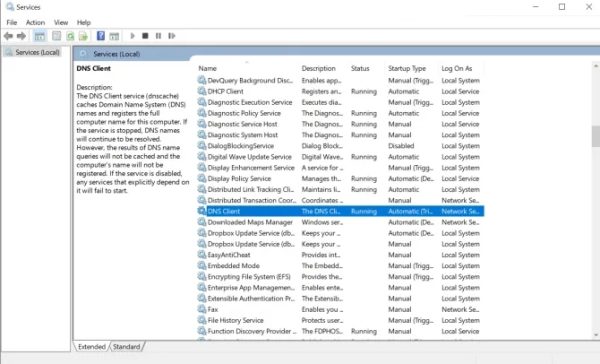
8. Restart the DNS client
- Open up your Run module by pressing your Windows key + R on your keyboard or by typing “run” into your computer’s search bar.
- Type in “services.msc” into the Run module.
- It will open up a list of services that are available to you. You will want to scan the list for the DNS client and right-click it. Then, hit the Restart option.
- Reopen your Google Chrome browser and check to see if this fixed the error.
9. Change DNS servers
To troubleshoot internet connection problems, it is wise to consider shifting the DNS servers being used. Utilizing an alternative server address can often resolve sluggishness issues, providing a valuable and convenient solution.
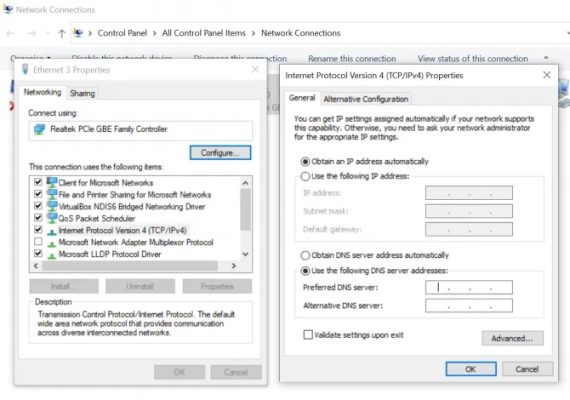
- In your task management tray, find your network icon, right-click it, and choose the “Open Network & Internet Settings” option.
- In the Advanced network settings section, click on Change adapter options. The Network Connections window will open.
- Right-click on your active internet connection, and open the Properties window.
- While on the Networking tab, find the Internet Protocol Version 4 (TCP/IPv4) line in the list, select it, and click the Properties button.
- In the new window that opens, select the “Use the following DNS server addresses” option and manually set your DNS server to either Google’s DNS or Open DNS. Google’s DNS primary server is 8.8.8.8, and its secondary server is 8.8.4.4. For Open DNS, the primary server is 208.67.222.222, and the secondary is 208.67.220.220.
- Once you’ve set these, hit OK and see if this fixes the issue.
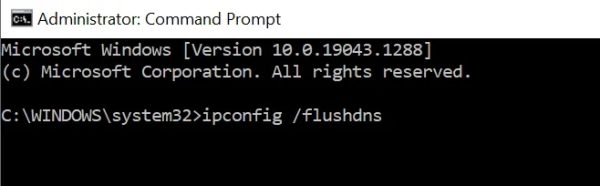
10. Flush the DNS cache
Outdated DNS caches can create an obstacle when attempting to access webpages, resulting in ‘This site cannot be reached’ or ‘This webpage is not available’. To resolve this issue, users need only flush the invalid cache and update it with the correct IP address.
- You will need to launch the Command Prompt module by typing “cmd” into your computer’s search in the Start Menu, right-clicking on it, and running it as an administrator.
- Once you have it up, enter the following command and press Enter:
- ipconfig /flushdns
- A “flushed the DNS resolver cache” message will pop across your screen once the command has been successfully run.
- Restart your computer to see if the error has been fixed.
11. Reset your TCP/IP address
- Run and launch the Command Prompt module by typing “cmd” into your computer’s search in the start menu, right-clicking on it, and running it as an administrator.
- Then type in and execute the following commands: (Hit Enter after each line.)
- ipconfig /release
- ipconfig /all
- ipconfig /flushdns
- ipconfig /renew
- netsh int ip reset
- netsh winsock reset
- Once these are done, restart your computer.
12. Temporarily disable your firewall and antivirus
Firewalls and antivirus applications can sometimes interfere with network connections. For optimal connection performance, ensure you properly configure the built-in security features of your device as well as any third-party apps that may impose rules which could block a successful website interaction. Additionally, check if router settings include an active blacklist rule to prevent potential disturbances from occurring. Depending on the type of firewall or anti virus software used, varying steps will be needed for implementation .
To ensure that the problem you are experiencing is not due to a security issue, we suggest taking an analytical approach and disabling your firewall or antivirus software temporarily.
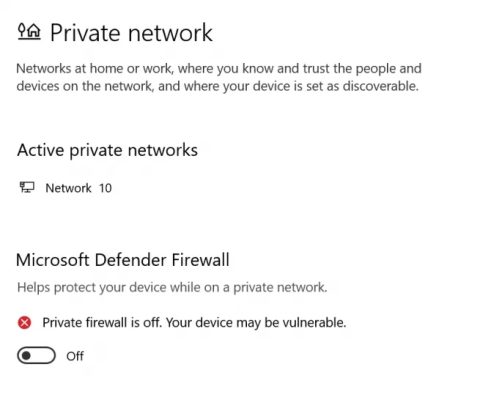
- Enter “Windows Security” into your Windows search bar and open the app.
- Select the Firewall & network protection option.
- Pick the network connection that is labeled as active.
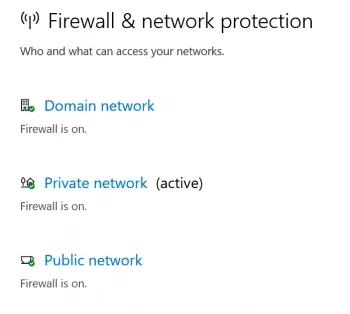
- Select the active network
- Toggle Windows Defender Firewall off to disable it.
- Check to see if your target website loads now.
Your security settings could be the very thing blocking your ability to access a particular website. As such, it is imperative that you investigate and re-configure them as soon as possible before turning on any other components of protection like firewalls or antivirus software. Doing otherwise will not provide adequate coverage against online threats in the long run.
13. Update your network drivers
Out-of-date network drivers can cause an array of complications, not least of which is the dreaded “This site can’t be reached” error. Fortunately, Windows keeps updating simple and hassle-free – so you’ll never need to face this issue again!
- In your Windows search bar, type in “Device Manager” and open the app.
- Click on the Network adapters group to show all available network components.
- Right-click each network adapter, and click on Update driver.
- Let Windows search automatically for the latest drivers.

14. Reinstall Chrome
If all else has failed, reinstalling Google Chrome may be a viable solution. Signing in with your Google account when running the browser enables you to automatically access and back up bookmarks and other essential data onto their cloud storage – so that once logged back in, nothing will have been lost! However, for those who do not log in, it is still important to export any personal information before attempting a re-installation of Chrome.
- Type “Control Panel” into your Windows search bar, and open the app.
- Click on the Programs and Features option.
- Find Google Chrome in the list, right-click it, and select Uninstall.
- Next, open another browser on your computer, navigate to Google’s Chrome download page, and click the Download Chrome button.
- Run the setup executable and follow the on-screen instructions to reinstall Chrome.
How to fix the “This site can’t be reached” error on Mac OS
For those who have a Mac OS, take the opportunity to enhance your online experience by altering DNS and TCP/IP4 in System Preferences. By accessing Network settings through Advanced Wi-Fi connection tab of your device you are able to customize various aspects for an improved user journey!
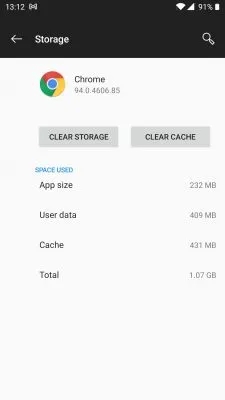
How to fix the “This site can’t be reached” error on Android
Android smartphone users looking to optimize their performance should consider clearing out browser and app data. On the computer, following similar steps will allow you to clear your history; while on your device’s settings in Apps under Google Chrome, one can opt for both a cache-clear and full reset of relevant information.
Conclusion
Have you been able to successfully resolve the ‘this site can’t be reached’ issue yet? If so, let us know what method proved most useful for your particular situation in our comments section below. We’d love to hear from you!