
Many of us have come to recognize and appreciate the power of Google Chrome – its sleek interface, extensive extension library, and lightning speed are simply hard to compete with. But all these perks do not come without a price; studies show Chrome can be as resource-hungry as our coffee cravings on Monday mornings!
Is your memory usage running too high? Fear no more – we’ve got 5 surefire fixes for you so you don’t have to sacrifice function over performance!
What Is All The RAM Used For?
Chrome has dynamic memory-management capabilities that provide a stable and reliable online experience. Rather than allocating all its RAM resources to one page, the browser takes an individualized approach by sectioning off each tab/window into its own self-contained processes with associated sub processes, granting faster speeds for navigating your favorite websites.
When you open up a tab on your browser and go to the YouTube video of your choice, that’s when something magical happens! Your computer begins an intricate task – utilizing a small portion of RAM in order perform numerous tasks needed to show your selected content.
- Logging you into the website.
- Using on-board graphics to load the web page’s design elements.
- Playing or pausing the video.
- Loading advertisements.
- Loading extensions that directly interact with YouTube (ad blocker, dark theme, etc.).
When you open multiple tabs or have numerous extensions running in your browser, it takes a toll on your RAM as more processes need to be put into motion. This causes an increase in the amount of memory utilized for each task that needs to occur before the page can fully load and function properly.
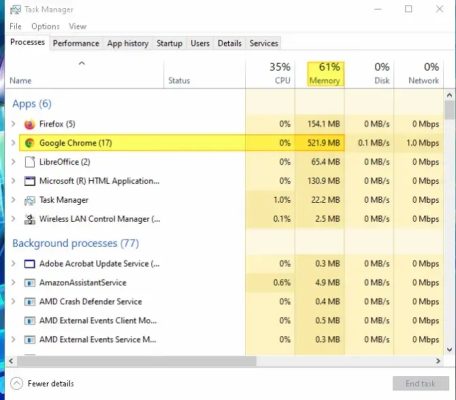
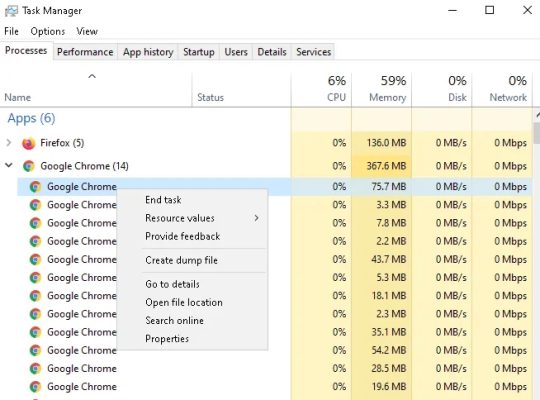
Thanks to Google Chrome’s design, each tab is run as its own process for better stability and security. This can be a great feature when something goes wrong with one page – no need to shut down the whole browser! However, it comes at a cost; all those separate processes use up quite a lot of RAM, which you may have noticed in your Task Manager if multiple Chrome entries take up space.
When Does Chrome Using Too Much Memory Become a Problem?
If you notice your computer straining under the weight of multiple Google Chrome tabs, that’s a sign that its memory consumption has become too high and is impacting other programs. It may be time to take action if your system starts freezing or crashing while running several Google Chrome windows!
5 Fixes for Chrome Using Too Much Memory
If your Chrome is struggling to keep up, there are several ways you can kick it back into gear. Purchasing more RAM and installing it in your computer may be one solution. However, if that looks like a little too much technical know-how, then we have five easy fixes directly applicable to the browser itself! Get ready – these solutions will make sure nothing slows down this fast engine of yours.
1. Disable Unnecessary Extensions
Memory spikes in Google Chrome can be caused by extensions running, slowing your browsing experience. These add-ons use extra resources but also may have memory leaks that further clog up available RAM. To improve performance and free more of it for yourself, disabling the unwanted extras is key: here’s how!
- Start with a clean open of your Google Chrome browser.
- Click on the 3-dots in the upper right-hand corner.
- Hover over “more tools” and choose extensions.
- This will open up a list of extensions your browser has access too.
- Disable all of them by clicking on the disable slider.
- Restart the browser and take note of how much memory Chrome is now using. If it is less by a considerable amount, this could be the root of your problem.

Instead of simply disabling your extensions, take the plunge and methodically re-enable each one to investigate any potentially memory-hungry culprits. Be sure that only essential extensions are reactivated so you can continue maximizing RAM efficiency!
2. Enable Hardware Acceleration
If you have a powerful graphics card installed on your PC, it can take the strain off your processor by helping accelerate tasks with hardware-based support. This way, more complex apps and games run faster and smoother!

- Open up Google Chrome and click on the 3-dots in the upper right-hand corner.
- Click on settings in the context menu.
- Scroll down and click on “advanced settings” to open up more options.
- Scroll until you see a section called “system”.
- Toggle on “use hardware acceleration when available.”
Resetting your browser may help solve any lingering technical issues – but watch out! If you don’t have a dedicated graphics card, enabling this feature may cause more problems than it solves. Take care when making changes to ensure your system keeps running smoothly.
3. Update Your Google Chrome
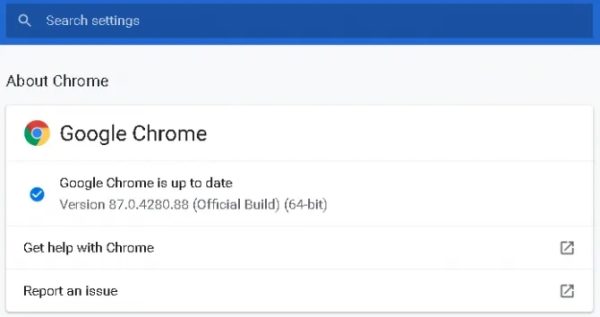
Staying up-to-date on Google Chrome can make a world of difference in your browsing experience. Outdated versions may be filled with hidden bugs, glitches, and stability issues that slow down performance – all without you knowing! To ensure the best possible results from using this browser, take some time to check if it’s been updated to its latest version; updating when needed will give you a smoother surfing journey.
- Open Google Chrome and click the 3-dots in the upper right-hand corner.
- Hover over the “help” option in the menu and choose “about Google Chrome” from the new set of options.
- You will be redirected to a new window where you will be told whether you have the latest version or not. If you do not, Chrome should update automatically.
- Wait until the update is downloaded and then restart your browser to install it.
4. End High Memory Footprint Processes
If you feel like your computer is slowing down, chances are it’s because too many of those pesky tabs and windows have taken up all the memory. Check for ballooning due to bugs or leaks with a built-in Task Manager – this can help identify which pages are hogging resources!
- On Windows: right-click your Start Bar and choose Task Manager from the list.
- On Mac: head to the Window menu and choose Processes.
Take control of your computer’s performance by managing its memory! Identify any Google Chrome applications that are hogging too much RAM and end the task. Put an end to all inactive or unnecessary processes for a faster, smoother experience.
5. Use Memory Saving Extensions
To combat memory issues, there are some tricks of the trade. Extensions can help free up storage and keep your system running smoothly; however, you’ll want to ensure these add-ons come from reliable sources first by looking at ratings and reviews!
Looking to make your browsing faster and more efficient? Check out The Great Suspender Chrome extension! This nifty tool helps prevent memory hogging by suspending tabs that haven’t been used for a certain amount of time. You can customize its features, like whitelisting sites so they won’t be suspended or making sure audio-playing or input-filled tabs stay active. It’s the perfect way to get lightning-speed page loads without sacrificing any user experience!


Conclusion
Struggling with memory issues while using Chrome? Don’t give up! Check out the extensions we’ve recommended, or try one of these browsers instead: Firefox, Opera, and chromium-based alternatives like Brave, Vivaldi, or Microsoft Edge. If you’re still having trouble, maybe it’s time to upgrade your RAM for a smoother experience.